1

Fix Valorant Error Code 57: Vanguard is not initialized

Valorant has officially another new error code on the list. Learn how you can fix Valorant error code 57: “Vanguard is not intialized” issue when playing the game. This issue is often related with the Riot anti-cheat system called “Vanguard”. There are various ways and methods to fix this particular issue.

One of which is to simply restart your computer. If you’ve tried this basic troubleshooting step, you can try to remove the completely Riot Vanguard Anti-cheat system on your computer and head back and freshly re-install Vanguard.

Video Tutorial

Uninstall Riot Vanguard

The first solution that you can do to fix the Valorant error code 57: Vanguard is not initialized error is to uninstall riot vanguard and properly reinstall it properly.

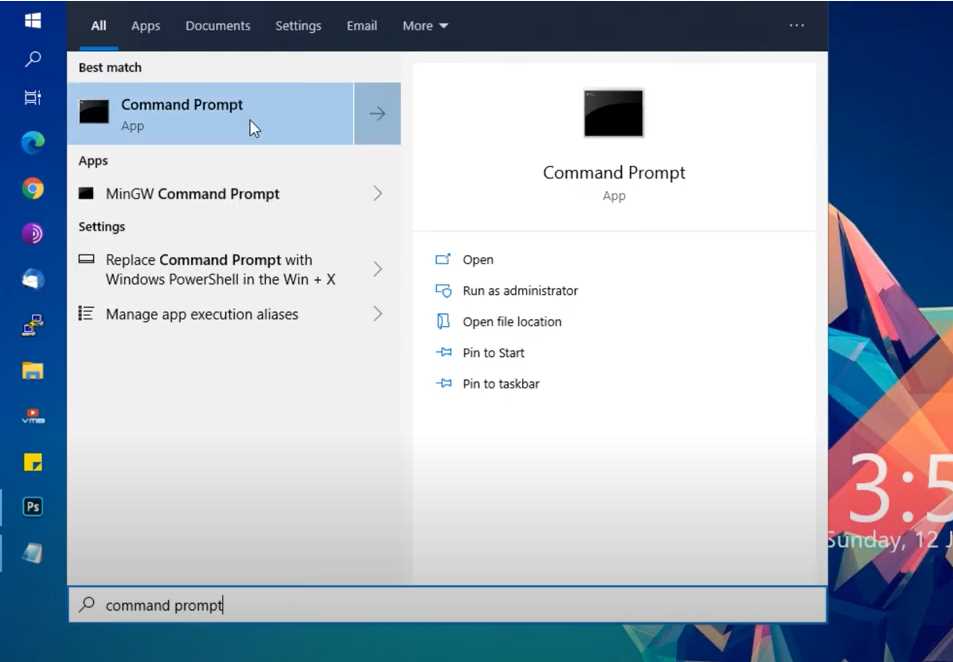
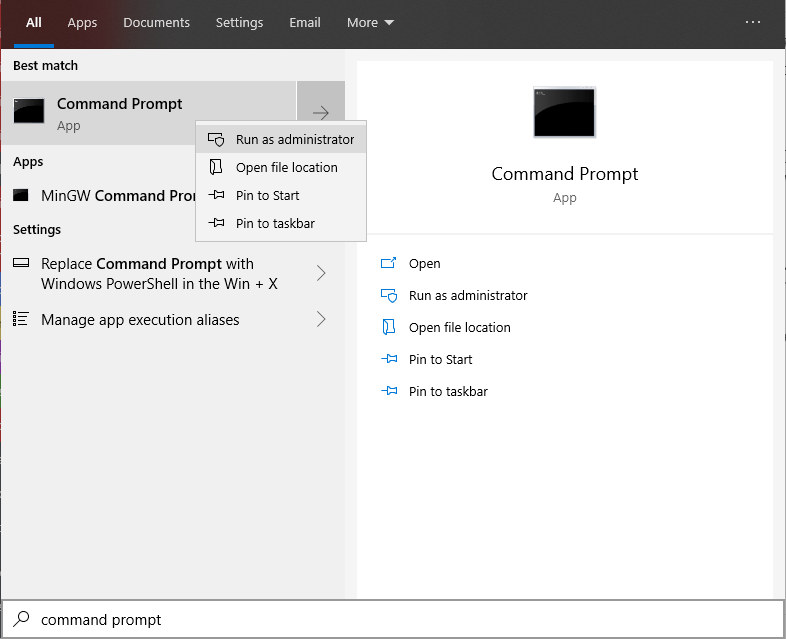
Go ahead and open up your start menu > search for Command Prompt, right click on it and make sure to click on Run as Administrator.

uninstall-riot-vanguard

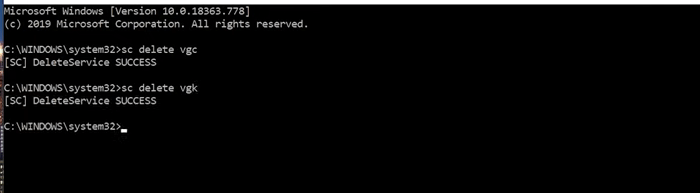
Type in the following commands:

  • sc delete vgc
  • sc delete vgk
service delete command prompt
serv

Then restart your computer.

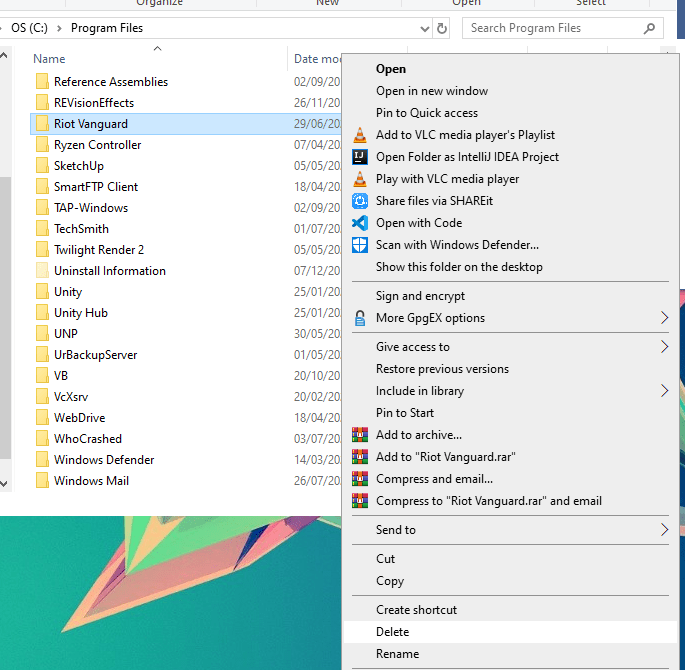
Next, go to your C:\ drive or the drive where your Windows is installed. Navigate to Program Files folder and look for Riot Vanguard folder and right click and delete that folder.

delete riot vanguard folder

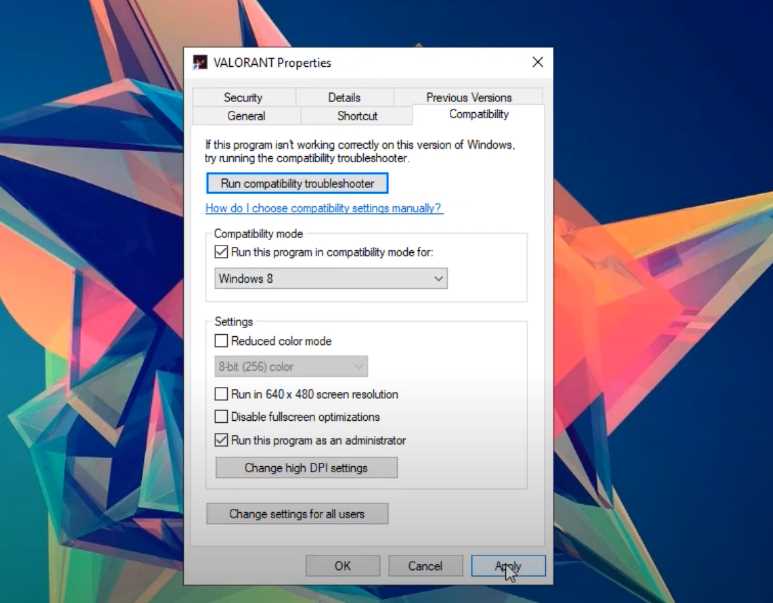
After that, right click your Valorant launcher on your desktop and click on Run as administrator.

riot vanguard installation

It will now start automatically to reinstall Riot Vanguard on your computer.

Once done, press the PLAY button and once you see the prompt that “Vanguard is not initialized” press the QUIT button.

Go ahead and restart one more time your computer to initialize the Riot Vanguard services on your computer.

Automatic Startup VGC Service

Another solution that you can try to fix the vanguard is not initialized error code 57 is to make sure that the vgc service is set to automatically start.

Open up start menu > services.msc > right click and run as administrator.

Look for “vgc” service name, then right click and click on properties.

Set the startup type to “Automatic“, then hit the apply button and ok. Then click on the start button if the service isn’t running.

Enable VGC on System Configuration

If everything still fails and yet you still get the error code 57 / vanguard is not initialized error then you can try to check if vgc service is set to run automatically on the system configuration app on Windows.

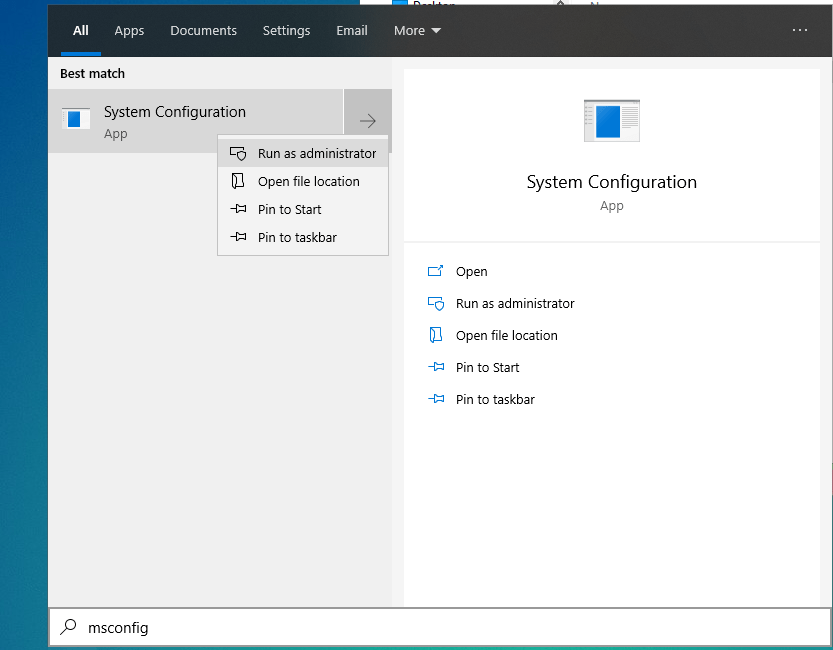
Open up start menu search for msconfig then right click the app and click on Run as Administrator.

open msconfig

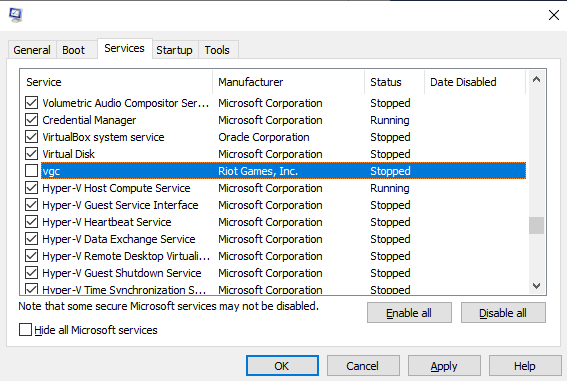
Once opened, go to the Services tab and look for the service called “VGC” and be sure that it is checked.

enable vgc service on msconfig
vgc service enabled on msconfig

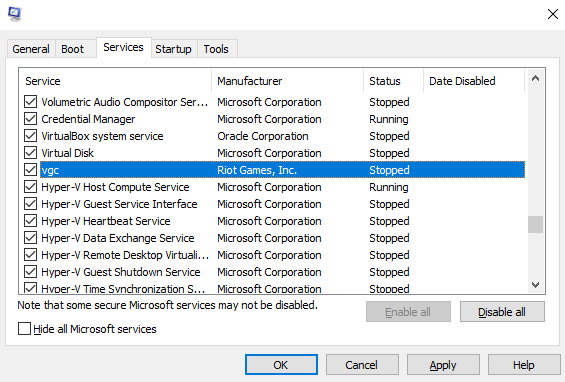
Once done, hit the apply and ok button. And restart your computer.

That’s about it! If everything still fails you can check out different related fixes for a different code that might be of help for your problem.

Leave your comments and feedback if this article was useful! Like our Facebook page to get updated with helpful tech related tips & tricks.


How to fix Valorant error code 38

Learn how you can fix the Valorant error code 38 that randomly causes crashes while in-game, or sometimes while loading up the game itself or even just by staying at the lobby.

The Valorant error code 38 can be caused by various factors such as some ordinary server disconnection, game ports being blocked and so on.

To fix this issue you can go ahead and try the possible fixes for this issue.

1. Re-launch Valorant Game

For starters, a simple restart of your Valorant game tends to fix the issue.

So go ahead and try simply restarting your Valorant game by properly closing your game through the Lobby > Gear Icon on the top-right portion of your screen and select Exit to Desktop.

2. Add Game Properly to Firewall

If a simple re-launch of the game won’t fix your problem, go ahead and follow this updated steps on how you can add properly every executables of Valorant as an exception to your Windows Firewall.

Firewall blocking the game is one of the most common reason for this particular error code 38 on Valorant.

Open up Start Menu and search for Firewall & Network Protection and open it up.

valorant-error-code-68-allow-to-firewall-1

Click on the Allow an app through Firewall and click on the Change Settings button with the administrator shield icon.

valorant-error-code-68-allow-to-firewall-2
valorant-error-code-68-allow-to-firewall-3

Click on Allow another app button then browse for your Valorant shortcut file on desktop. Select the shortcut file and hit open button. It will add an app called RiotClientServices.

valorant-error-code-68-allow-to-firewall-4

Then add another app then navigate to your Valorant installation path. Open up the Valorant Folder.

valorant-error-code-68-allow-to-firewall-5

Open the live folder and add the Valorant.exe application to the firewall.

valorant-error-code-68-allow-to-firewall-6

This will add an app called BootstrapPackagedGame, and make sure that it is allowed for both private and public networks.

valorant-error-code-68-allow-to-firewall-7

Allow another app one last time, while on the same path navigate through Valorant Installation Path – “Valorant/live/shootergame/binaries/win64/” and then add the VALORANT-Win64-Shipping.exe to the exceptions.

valorant-error-code-68-allow-to-firewall-8
valorant-error-code-68-allow-to-firewall-9
valorant-error-code-68-allow-to-firewall-10

Be sure to have the rules for Valorant, BootstrapPackagedGame and RiotClientServices apps to be allowed both for private and public networks by ticking the respective checkboxes.

Then go ahead and see if that fixes the error code 38 on your Valorant game.

3. Restart your router / modem

If the firewall trick didn’t fix this error on your end, try restarting your router / modem as it might fix this issue.

Go ahead and turn off your router / modem for at least 1 minute before turning it back on to have its IP configuration refreshed.

Check if the game now works out fine!

4. Check if any antivirus blocks Valorant

Although this is already common, but some users reported that their third-party firewall or antivirus is the leading cause for this particular error code 38 on Valorant.

So be sure to check, especially if you have an third-party firewall other than the default Windows Defender to add the executables as shown on the 2nd method to the exceptions.

And see if that fixes your problem.

5. Check Servers / Contact Riot Support

Another reason that could possibly cause this disconnection while you are in-game is a simple SERVER MAINTENANCE.

Be sure to give it a check if the servers of Valorant is currently undergoing maintenance or issues.

Otherwise, if you’ve exhausted all option, your last resort is to contact riot support by opening a ticket here.

Related Articles:


Ultimate Guide: How to fix Wifi / Packet Loss / Slow Internet

In this article, I’ll show you the ultimate guide in fixing common wifi problems such as packet loss, intermittent Wifi connection and overall slow internet speed. There could be a number of possible common fixes or solution for this broad area of concern hopefully one will help fix your wifi network to get back up and running as optimal as possible.

1. Slow Wifi / Slow Internet

Devices connected on your wifi router share the same so called bandwidth/speed on your network. Each users that browse a website, stream a video on YouTube or watch Netflix consume download and upload speed.

To check your current download and upload speed to diagnose this issue, you can conduct a speed test using these popular sites:

In the article of Nicole George “Frequently asked questions on internet speeds — What speed do you need?“, the recommended speed by the Federal Communications Commissions (FCC) recommends speeds of 12-25 Mbps for families that have multiple internet users or for frequent online streaming.

With that being said, after running the speedtests by either from OOkla or Fast.com tests, you can check whether you are getting sufficient internet speeds. If you’re not getting the recommended wifi speed try the following:

The Quick Fix for Slow Wi-Fi Internet Speeds:

  • Try disconnecting all devices first connected on your Wi-Fi network.
  • Restart your modem for (15-30 seconds) to refresh the IP configuration.
  • Close any downloads, updates, or disable smartphone updates.
  • Check if there are any unauthorized devices connected on your router (typically routers have a webpage interface where you can check the connected list of devices)
ASUS RTN18-U Dashboard
All Connected Clients on a ASUS RTN18-U Router

If all above fails, you can try contacting your Internet Service Provider (ISP) and ask them if they are conducting any maintenance, or having network issues that may be the cause of your slow Wi-Fi speed issue.

2. DNS Server is Not Responding

Two common things may cause this issue that pops up on your Windows computer “DNS Server is not responding” either your ISP network default DNS server went offline or you have a misconfigured custom DNS server set on your network.

To fix this: You can go to your taskbar, right-click your Network Icon > Open Network & Internet Settings, click on Change Adapter Options and locate your network adapter / wifi adapter then right click on it and click on Properties. Look for the Internet Protocol Version 4 (IPv4) and click on properties. If you have the “Obtain DNS server address automatically” checked, try choosing the “Use the following DNS Server addresses” and enter the following:

Preferred DNS: Cloudflare Alternate DNS: Google DNS

And hit the ok button and restart your computer. However if you have an existing records under that particular option and you get the DNS Server is Not Responding error, try the other way around and select the “Obtain DNS Server address automatically” and restart your computer.

3. Wifi Keeps Disconnecting

One common cause of this particular wifi issue is an overlapping wifi channel on your area. Having overlapping Wi-Fi channels can result to intermittent wifi connection hence there are three common ways to fix this issue.

To fix this: First, you can try simple restarting your router. Turn off your router for at least 1 minute before turning it back up. Restarting your router will result to a configuration “refresh” wherein your router may try to find a different wifi channel to broadcast your wifi ssid to prevent interference between networks.

If that didn’t work, you can try manually moving your wifi router if that permits you to move your router and see if that fixes the issue.

Otherwise, you can configure manually your wifi network (2.4Ghz or 5Ghz) wifi to use a specific channel only either 1,6 or 11 channel to prevent any overlapping frequency with other networks. Also, if you are in a congested area try keeping the frequency bandwidth to only 20 MHz.

Wifi Frenquency Channel Configuration – AN5506-04-FA ONU Fibr Router

4. Some Websites Don’t Load

Websites can sometimes fail to load due to various limitations set by your ISP, system configuration or country-wide restrictions.

Quick Fix: To quickly troubleshoot and fix this wifi problem, try changing first the DNS settings on your computer as shown in the 2nd step on this article. Go to your taskbar, right-click your Network Icon > Open Network & Internet Settings, click on Change Adapter Options and locate your network adapter / wifi adapter then right click on it and click on Properties. Look for the Internet Protocol Version 4 (IPv4) and click on properties. If you have the “Obtain DNS server address automatically” checked, try choosing the “Use the following DNS Server addresses” and enter the following:

Preferred DNS: Cloudflare Alternate DNS: Google DNS

Once done, close everything up and open up a command prompt by going to your start menu and search for Command Prompt and right click on it and run it as administrator.

Type in the command:

ipconfig /flushdns

Restart your computer, and see if that fixes your problem. If that wouldn’t still fix websites not loading up on your network, another thing that you can try is to use free VPN services. VPN or Virtual Private Networks masks your IP address to prevent internet censorship (eg. Website blocking, and ISP site monitoring, etc) and see if that fixes your problem.

If none fixed your problem, you can check if the website itself is offline for everyone using the this tool.


How to change Wifi Password PLDT Home Fibr 2020

Learn how you can change wifi password on pldt home fibr router 2020. It might be intimidating when trying to change wifi password on pldt home fibr but follow along in this beginners friendly guide. Making sure that no unauthorized users are connected to your PLDT WiFi is crucial as they could be hogging up your bandwidth and speed thus makes your internet experience sluggish.

In this guide, I’ll walk you through step-by-step on how you can change the wifi password on your pldt home fibr router.

The steps on this video will be demonstrated using the router AN5506-04-FA PLDT ONU Router but the steps are generally applicable to almost any type/model of router.

Follow along the steps written below or through the video tutorial embedded on this page.

Video Tutorial

How to change Wifi Password on PLDT Home Fibr Router


To change the wifi password on PLDT Home Fibr router we need first to access the login page of the router.

By default the address is 192.168.1.1 so go ahead and open up a web browser (preferably modern browsers such as Google Chrome / Firefox / Opera / etc.) and enter this on the address bar: https://192.168.1.1 or 192.168.1.1 (with or without the https:// see which works out for you.)

Access the login page of your PLDT Home Fibr Router

If you are shown with this kind of error “Your connection is not private” simply click the advanced button and click on Proceed to 192.168.1.1 (unsafe)

Login page connection is not private pldt error
Note: I have changed my router ip address from 192.168.1.1 to 192.168.1.3

Afterwards, you will be taken to this login page. (The user interface / design may vary depending on your PLDT Home Fibr router)

PLDT Login Page

By default, the username is admin and the password is 1234 or 12345. This password may change if you’ve changed this already before.

Upon logging in it might ask you to change your password since the password 1234 is not secure and can be easily guessed by anyone connected on your router.

PLDT Change Initial Password Prompt

You MAY or MAY NOT see this kind of screen but if you do simply enter the old password “1234” and enter your new own password.

If you see this configuration prompt


New Passwords MUST include characters, numbers, and symbols. (Eg. !*TestPassword01) will work but (Eg. TestPassword) will not be accepted as it doesn’t have symbol/s and/or numbers in it.

The same goes with the 2.4G SSID1 and 5GSSID1 Passwords they must also meet the same requirement.

For the SSID Name, it represents the “Wifi Name” on your router so what you input to the SSID Name will be basically your Wifi Name.

Once configuring everything hit the apply button and you’ll be able to login.

If you didn’t see that configuration prompt


You can simply go ahead and continue along in this tutorial.

You will now be taken to this page and dashboard.

PLDT Device Information Page

Click on the Network -> Advanced and you will be shown with options to select which wifi ssid number you would like to change/configure.

Network Tab

To change the password, be sure to have the Security Mode under the Security Policy set to WPA/WPA2/WPAPSKWPA2PSK any of the security modes.

Then change the WPA Algorithms to TKIPAES and enter the wifi password you want to use under the Passphrase.

Change Wifi Password Router

Once done changing the wifi password, go ahead and don’t forget to apply the changes by hitting the Apply button.

Depending on your router, but on this particular router you can have up to 4 (Four) 2.4 Ghz Wifi SSIDs you can navigate through changing the SSID Choice.

Select Router SSID

And to change the PLDT HOME FIBR wifi password for the 5Ghz frequency, just simply go to the 5G Advanced tab and you will be shown with the similar configuration page.

Once done you can now reconnect to your wifi ssid and see if the passwords have been changed successfully.

Leave your comments, feedbacks down below or through YouTube comment section! I would love to hear your feedback and share your problems through the community and friendly tech-savy people might give you a hand.

Other Related Articles


How to fix Valorant High Ping Spikes in Philippines / SEA Server

Learn how to fix Valorant High Ping Spikes in Philippines/SEA Server.

In this video-article tutorial, I’ll be showing you how you can address this high ping issue on Valorant especially if you are playing on Philippines, SEA Server or anywhere in ASIA.

I will be showing you 5 methods that could possible fix this issue so follow them carefully by reading through this article or following the video guide below.

Video Tutorial

Fix Valorant High Ping Spikes in SEA Server / Philippines

Valorant Launcher Update Account

Riot may have messed up some settings or configurations on your account that may be causing this high ping issue.

One way to fix this is to click on the update account option on your Valorant Launcher.

Open up the Valorant Launcher and hover your mouse on the small question mark icon.

Click on the update your account, then login your account and proceed with the instructions.

Another solution you can try to fix this is to change DNS on Windows.

Change DNS on Windows Lan/Wifi Adapter

First, to change your dns go to your Windows Taskbar and right click your network icon.

Click on “Open Network and Internet Sharing Settings”.

On the Settings Window, click on the Change Adapter Options.

Right-click your network adapter/wifi adapter click on properties.

Select the Internet Protocol Version 4 (TCP/IPv4) then click on the properties button.

Click on the Use the following DNS server addresses option and enter the following:

Hit ok and close all the windows once done and restart your computer.

Another solution that might fix this issue is to set the Valorant game on High Priority.

Set Valorant to High Priority on Task Manager

Launch first Valorant wait until the game is fully loaded up into the lobby.

Go to your task bar and open up Task Manager.

Right Click Valorant and click on Go to details.

Right click the Valorant-Win64-Shipping and Valorant process and set it to High Priority.

Test and check if that fixes the problem.

Another solution that you can do is to reduce the Max FPS in game.

It has been discussed that lowering the Max FPS setting on some setup reduces the latency up to 10-20 ms.

Reduce the In-game Max FPS

Launch your Valorant game and go to the Settings > Video Tab.

Change the Max FPS Always to 50-60 or even 40 and see if that fixes your problem.

Another possible fix for this one is to disable Windows Firewall or Add Valorant to exception.

Disable Firewall / Add Valorant Executables to Exception

Open up Start Menu and search for Firewall & Network Protection and open it up.

valorant-error-code-68-allow-to-firewall-1

Click on the Allow an app through Firewall and click on the Change Settings button with the administrator shield icon.

valorant-error-code-68-allow-to-firewall-2
valorant-error-code-68-allow-to-firewall-3

Click on Allow another app button then browse for your Valorant shortcut file on desktop. Select the shortcut file and hit open button. It will add an app called RiotClientServices.

valorant-error-code-68-allow-to-firewall-4

Then add another app then navigate to your Valorant installation path. Open up the Valorant Folder.

valorant-error-code-68-allow-to-firewall-5

Open the live folder and add the Valorant.exe application to the firewall.

valorant-error-code-68-allow-to-firewall-6

This will add an app called BootstrapPackagedGame, and make sure that it is allowed for both private and public networks.

valorant-error-code-68-allow-to-firewall-7

Allow another app one last time, while on the same path navigate through Valorant Installation Path – “Valorant/live/shootergame/binaries/win64/” and then add the VALORANT-Win64-Shipping.exe to the exceptions.

valorant-error-code-68-allow-to-firewall-8
valorant-error-code-68-allow-to-firewall-9
valorant-error-code-68-allow-to-firewall-10

Be sure to have the rules for Valorant, BootstrapPackagedGame and RiotClientServices apps to be allowed both for private and public networks by ticking the respective checkboxes.

You can also try to update your account using riots troubleshooting page if in any case your account has been set to a different location.

Change Region of Riot Account

It is possible that if you had your account created already before (if you’ve played League of Legends on any server or basically just played the game before) chances that your account might be connecting on a different region.

Click on the change account region button and login your account and follow along the instructions.

If that automatic change region page fails, you might have to submit a support ticket here.

Related Articles


Fix Hyperscape The Procedure Entry Point Error

In this article I’ll show you the possible solutions to fix Hyperscape the procedure entry point error or vulan-1.dll hyperscape error while playing the newly released open-beta game Hyperscape.

There could be a number of possible causes for this one such as outdated graphics card, missing vulkan-1 dll file, and other gpu related problems.

I will show you here 5 major solutions for this particular error.

Fix Hyperscape The Procedure Entry Point Error

This kind of error in Hyperscape can be solved by a number of particular ways. This error points out that there’s something wrong with your system files and configuration, graphics driver incompatible/outdated drivers. Updating your graphics drivers usually addresses this issue but you might still be shown with the vulkan-1.dll hyperscape error. To fix this error on Hyperscape, simply follow through the detailed steps down below:

Fix 1: Update your graphics drivers

Yep, you might have heard this tip / solution too often times but this solution worked out for the most number of users that are trying to play the newly launched game! Updating your graphics drivers is one of the most important step in making sure that your graphics card is compatible with the game. The most practical method to do first when trying to fix Hyperscape The Procedure Entry Point Error is to update your graphics drivers. To update your drivers, follow the instructions below.

So go ahead to your Start menu > Search for device manager > Expand the Display Adapters to know which graphics card are you using.

Go to the official drivers download site depending on your manufacturer:

After the update process, restart your computer and see if Hyperscape is now working properly. Otherwise, if you encounter still the same error or the vulkan-1.dll hyperscape error, proceed e with the next step below which is to download the vulkan-1.dll itself and place it on your system.

Fix 2: Download Vulkan-1.dll for Hyperscape

Another fix for this particular issue is by downloading the vulkan-1.dll for your system. However, before doing this step, ensure that you have updated your graphics drivers to the latest version. Vulkan-1.dll Hyperscape error means that the game fails to launch or load properly due to the missing required DLL library component. So in order to resolve this missing library file, simply download the vulkan-1.dll and place it on your system folders and game directory folders. To do so, follow the steps:

Installing Vulkan-1.dll on System Folders

  1. Download Vulkan-1.dll.
  2. After downloading, extract the file to C:\Windows\System32
  3. If prompted to replace, select overwrite and replace.
  4. Next, extract the file in C:\Windows\SYSWOW64
  5. If prompted to replace, select overwrite and replace.

Note: You must have administrative privilege on your windows account to place these files on the system folders.

Next, Install Vulkan-1.dll on Hyperscape

  1. Open the download Vulkan-1.dll archive/zip file.
  2. Go to your Hyperscape installation directory folder, or
  3. Go to Ubisoft Game Launcher folder
    • C:\Program Files\Ubisoft Game Launcher or
    • C:\Program Files(x86)\Ubisoft Game Launcher
  4. Open the games folder, then open up Hyper Scape.
  5. Place the vulkan-1.dll on this folder.

Go ahead and try relaunching the game once done and see if the error got fixed.

Fix 3: Set Hyperscape as High Performance

Another reason that could be causing this error on Hyperscape is that the system fails to provide the best graphics performance on the game itself. You can change this performance profile on Windows 10 to ensure that Hyperscape’s utilizes your GPU processing power. To change the gaming profile, follow these steps:

  1. Go to your Start Menu > Search for Graphics Settings.
  2. Open up Graphics Settings and browse for the Hyperscape game shortcut on your desktop.
  3. Set the graphics preference to High Performance.

After that, go ahead and try playing Hyperscape and see if Hyperscape The procedure entry point error is now fixed. If it still shows you the error, try these other fixes below.

Fix 4: Update the Driver using Device Manager

If in any case, the fixes above didn’t manage to solve Vulkan-1.dll error on Hyperscape, you can try updating your graphics driver using the device manager app on Windows. Sometimes, if your graphics card is no longer supported on the official website, a more updated graphics driver can be downloaded from the Windows Update repositories itself using the “Update Driver” option.

To update your graphics card using the device manager simply do these steps:

  1. Open up again Device Manager by searching “Device Manager” on your start menu.
  2. Expand the Display adapters and right click your display adapter.
  3. Click on Update Driver option. Wait for it to finish.
  4. Restart your computer afterwards.

Hopefully by that time, you manage to get Hyperscape The Procedure Entry Point Error fixed already. If still in any rare cases you still encounter the same error, kindly check the last fix on this guide.

Fix 5: Uninstall “unused” graphics drivers

Your last resort to fixing this problem is to check if you have any unused graphics drivers laying around on your computer. When you’ve upgraded or installed a new graphics card even a long time already, tendencies is that there’s still “leftover” driver laying around unused by your previous old graphics card or onboard graphics card. This can cause an issue with Hyperscape as instead of using your new GPU, Hyperscape might be forcing to use the old graphics driver detecting it as incompatible or outdated hence showing you Vulkan-1.dll error or The Hyperscape Procedure Entry Point error.

If you happen to have an extra graphics card driver installed on your computer, you can uninstall them by:

  1. Go to the Windows device manager app.
  2. Expand the display adapters, then identify which graphics driver is no longer being used.
  3. Right-click the graphics adapter and select the uninstall option.

Reboot your computer and see if the issue has been fixed. Hopefully by this time, you are now able to play the game without any issue. If you are confused with any particular step, feel free to watch and follow the video tutorial below and let me know your feedbacks in the comments section down below!

Video Tutorial


How to fix Valorant error code 68

In this article I’ll show you how you can fix Valorant error code 68 with the possible methods / solutions!

Fix Valorant Error Code 68

This guide will practically address the particular error, “Valorant has encountered a connection error, please re-launch the game” with the error code 68 shown along with this error window. A lot of players reported that they are experiencing Error Code 68 that pops out randomly during matches or while in-game. Error Code 68 is one of the many annoying error codes in Valorant.

There are possible various causes for this particular error and so carefully follow along the video tutorial or the text guide written below to get this problem fixed.

Video Tutorial

Step-By-Step Guide

Solution #1: Add Valorant to Firewall Exception

The first possible fix for Valorant error code 68 is to add valorant to firewall exception.

Open up Start Menu and search for Firewall & Network Protection and open it up.

valorant-error-code-68-allow-to-firewall-1

Click on the Allow an app through Firewall and click on the Change Settings button with the administrator shield icon.

valorant-error-code-68-allow-to-firewall-2
valorant-error-code-68-allow-to-firewall-3

Click on Allow another app button then browse for your Valorant shortcut file on desktop. Select the shortcut file and hit open button. It will add an app called RiotClientServices.

valorant-error-code-68-allow-to-firewall-4

Then add another app then navigate to your Valorant installation path. Open up the Valorant Folder.

valorant-error-code-68-allow-to-firewall-5

Open the live folder and add the Valorant.exe application to the firewall.

valorant-error-code-68-allow-to-firewall-6

This will add an app called BootstrapPackagedGame, and make sure that it is allowed for both private and public networks.

valorant-error-code-68-allow-to-firewall-7

Allow another app one last time, while on the same path navigate through Valorant Installation Path – “Valorant/live/shootergame/binaries/win64/” and then add the VALORANT-Win64-Shipping.exe to the exceptions.

valorant-error-code-68-allow-to-firewall-8
valorant-error-code-68-allow-to-firewall-9
valorant-error-code-68-allow-to-firewall-10

Be sure to have the rules for Valorant, BootstrapPackagedGame and RiotClientServices apps to be allowed both for private and public networks by ticking the respective checkboxes.

Solution #2: Change DNS on Windows

Another step that we can do to fix valorant error code 68 is to change dns on Windows.

valorant-error-code-68-change-dns-fix-1

Right click on your Windows network icon or wifi icon and click on Open Network & Internet Settings.

valorant-error-code-68-change-dns-fix-2

Click on Change adapter options then right click your network or wifi adapter click on properties.

valorant-error-code-68-change-dns-fix-3

Find Internet Protocol Version 4 (TCP/IPv4) then click on properties.

valorant-error-code-68-change-dns-fix-4

Click on the Use the following DNS addresses automatically. and enter the following respectively:

Preferred DNS Server: 1.1.1.1

Alternate DNS Server: 8.8.4.4

Save all the changes and restart your computer.

Solution #3: Use VPN Temporarily to play Valorant

Lastly, if all solution fails, try using a vpn and see if the valorant error code 68 gets fixed.

There had been reports that Valorant has some issues with routing with different ISPs as of the moment hence one way to temporarily address this concern rather than wait till it gets fixed by riot is to use VPN.

Signup for a free account (3-servers available for free) then download and install ProtonVPN.

valorant-error-code-68-fix-use-vpn

After installation, run the VPN and try playing the game if you still encounter error code 68.

Related Articles


How to fix Valorant error code 138 connection error

Learn how to fix Valorant error code 138 connection error easily with all the possible fix or solution. Valorant error code 138 can be fixed by these methods.

This error are reported to be occurring just recently with lower-end computers and so I have compiled the possible solutions SO FAR for this particular error code 138 connection error in Valorant.

Follow along on the video tutorial below or read through the step-by-step guide below.

Video Tutorial(s)

Step-by-Step Guide

Solution 1: Bcdedit Configurations

The first solution to fix error code 138 on Valorant is to apply some bcdedit configurations.

Open up a command prompt by going to your start menu and look for “Command Prompt” and make sure to run it as administrator.

valorant-connection-error-code-138-open-command-prompt

Type in the following codes:

bcdedit.exe /set {current} nx OptIn
bcdedit.exe /set testsigning off
bcdedit.exe /set nointegritychecks off

Note: If you experience “The value is protected by Secure Boot policy and cannot be modified or deleted” make sure to turn off first your secure boot option on your BIOS.

Next, restart your computer and check if Valorant is now working properly.

Otherwise, continue with the other possible fixes below.

Solution 2: Set Compatibility to Windows 8

Another solution to fix the error code 138 on Valorant is to Set the Compatibility to Windows 8.

Locate your Valorant shortcut icon on your desktop or start menu.

Right click on the shortcut and go to properties.

Check the “Run this program in compatibility mode for: Windows 8” and check the Run this program as an administrator. Hit the apply and ok button.

valorant-connection-error-code-138-set-compatibility-windows-8

Solution 3: Set VGC Process Priority to “Normal”

Another solution that you can try to fix error code 138 on Valorant is to set the VGC Process Priority to “Normal”.

Go ahead and open up task manager and look for the process “Vanguard tray notification” right click on it and click on go to details.

valorant-connection-error-code-138-open-task-manager

Right click on the process and make sure to set the priority to Normal.

Other possible soluton:

If all else fails and you still get error code on Valorant, kindly check if your processor is AMD A-Series processor such as AMD A6, A10, and so on. there had been reports that the Valorant’s Vanguard Anti-cheat system has a particular conflict / issue with these processors and also some other unnamed processors.

Riot is investigating the matter as of the moment and so if nothing fixed your problem and it still shows up error code 138, you’ll have to wait for a patch from Riot to address this issue.

Reddit thread Source

Related Articles


How to quickly enable fps and ping counter in Valorant

Learn how you can quickly enable fps and ping counter in Valorant!

In this article, If you’ve been an old-time FPS player before you will know how important it is to have the FPS and Network Latency / Ping shown right on your screen!

If you are just starting out, well it’s never too late to learn!

I have included in this article a video tutorial to demonstrate the steps or you can just read through the steps written right below it.

Video Tutorial

Steps to Enable Ping & Fps in Valorant

  1. Open up the game, and upon entering the lobby click on the gear icon on the top-right most portion of the screen.
  2. Click on settings. You’ll be taken to General tab by default go to Video Settings.
  3. While on the Video Settings, you will be shown with another 3 options.
  4. Open up the stats under the Video Settings.
  5. Enable “Client FPS” to show game fps and for the ping the options that you can enable are “Server Tick Rate”, “Network Round Trip Time” and “Packet Loss”.

Related Articles


How to limit wifi / lan users on PLDT Fibr Router (NO QOS)

Learn how you can limit wifi / lan users on PLDT Fibr Router without the need of QOS.

In this article, I included a video tutorial to demonstrate the needed steps to do this kind of feature on your laptop / desktop without the need of router QOS.

Video Tutorial

Download Arcai-Net Cut

Steps & Guide

Step (1/5): Enable telnet switch using fiberhomesuperadmin account.

PLDT Fibr Superadmin Credentials (2020): Click here

Step (2/5): Enable telnet Client on Windows

Step (3/5): Disable AP Isolation Telnet Credentials: Username: gepon or gpon Password gepon or gpon Command to be used: control port_fw_eligiblity_switch disable

Note: If you experience unkown command on Telnet you can SKIP this part and continue to STEP 4 & 5.

Step (4/5): Install Arcai Netcut on Windows or Android (Download Link Above)

Step (5/5): Configure / limit speeds of users! http://www.arcai.com/netCut/s/