1

Fix Hyperscape The Procedure Entry Point Error

In this article I’ll show you the possible solutions to fix Hyperscape the procedure entry point error or vulan-1.dll hyperscape error while playing the newly released open-beta game Hyperscape.

There could be a number of possible causes for this one such as outdated graphics card, missing vulkan-1 dll file, and other gpu related problems.

I will show you here 5 major solutions for this particular error.

Fix Hyperscape The Procedure Entry Point Error

This kind of error in Hyperscape can be solved by a number of particular ways. This error points out that there’s something wrong with your system files and configuration, graphics driver incompatible/outdated drivers. Updating your graphics drivers usually addresses this issue but you might still be shown with the vulkan-1.dll hyperscape error. To fix this error on Hyperscape, simply follow through the detailed steps down below:

Fix 1: Update your graphics drivers

Yep, you might have heard this tip / solution too often times but this solution worked out for the most number of users that are trying to play the newly launched game! Updating your graphics drivers is one of the most important step in making sure that your graphics card is compatible with the game. The most practical method to do first when trying to fix Hyperscape The Procedure Entry Point Error is to update your graphics drivers. To update your drivers, follow the instructions below.

So go ahead to your Start menu > Search for device manager > Expand the Display Adapters to know which graphics card are you using.

Go to the official drivers download site depending on your manufacturer:

After the update process, restart your computer and see if Hyperscape is now working properly. Otherwise, if you encounter still the same error or the vulkan-1.dll hyperscape error, proceed e with the next step below which is to download the vulkan-1.dll itself and place it on your system.

Fix 2: Download Vulkan-1.dll for Hyperscape

Another fix for this particular issue is by downloading the vulkan-1.dll for your system. However, before doing this step, ensure that you have updated your graphics drivers to the latest version. Vulkan-1.dll Hyperscape error means that the game fails to launch or load properly due to the missing required DLL library component. So in order to resolve this missing library file, simply download the vulkan-1.dll and place it on your system folders and game directory folders. To do so, follow the steps:

Installing Vulkan-1.dll on System Folders

  1. Download Vulkan-1.dll.
  2. After downloading, extract the file to C:\Windows\System32
  3. If prompted to replace, select overwrite and replace.
  4. Next, extract the file in C:\Windows\SYSWOW64
  5. If prompted to replace, select overwrite and replace.

Note: You must have administrative privilege on your windows account to place these files on the system folders.

Next, Install Vulkan-1.dll on Hyperscape

  1. Open the download Vulkan-1.dll archive/zip file.
  2. Go to your Hyperscape installation directory folder, or
  3. Go to Ubisoft Game Launcher folder
    • C:\Program Files\Ubisoft Game Launcher or
    • C:\Program Files(x86)\Ubisoft Game Launcher
  4. Open the games folder, then open up Hyper Scape.
  5. Place the vulkan-1.dll on this folder.

Go ahead and try relaunching the game once done and see if the error got fixed.

Fix 3: Set Hyperscape as High Performance

Another reason that could be causing this error on Hyperscape is that the system fails to provide the best graphics performance on the game itself. You can change this performance profile on Windows 10 to ensure that Hyperscape’s utilizes your GPU processing power. To change the gaming profile, follow these steps:

  1. Go to your Start Menu > Search for Graphics Settings.
  2. Open up Graphics Settings and browse for the Hyperscape game shortcut on your desktop.
  3. Set the graphics preference to High Performance.

After that, go ahead and try playing Hyperscape and see if Hyperscape The procedure entry point error is now fixed. If it still shows you the error, try these other fixes below.

Fix 4: Update the Driver using Device Manager

If in any case, the fixes above didn’t manage to solve Vulkan-1.dll error on Hyperscape, you can try updating your graphics driver using the device manager app on Windows. Sometimes, if your graphics card is no longer supported on the official website, a more updated graphics driver can be downloaded from the Windows Update repositories itself using the “Update Driver” option.

To update your graphics card using the device manager simply do these steps:

  1. Open up again Device Manager by searching “Device Manager” on your start menu.
  2. Expand the Display adapters and right click your display adapter.
  3. Click on Update Driver option. Wait for it to finish.
  4. Restart your computer afterwards.

Hopefully by that time, you manage to get Hyperscape The Procedure Entry Point Error fixed already. If still in any rare cases you still encounter the same error, kindly check the last fix on this guide.

Fix 5: Uninstall “unused” graphics drivers

Your last resort to fixing this problem is to check if you have any unused graphics drivers laying around on your computer. When you’ve upgraded or installed a new graphics card even a long time already, tendencies is that there’s still “leftover” driver laying around unused by your previous old graphics card or onboard graphics card. This can cause an issue with Hyperscape as instead of using your new GPU, Hyperscape might be forcing to use the old graphics driver detecting it as incompatible or outdated hence showing you Vulkan-1.dll error or The Hyperscape Procedure Entry Point error.

If you happen to have an extra graphics card driver installed on your computer, you can uninstall them by:

  1. Go to the Windows device manager app.
  2. Expand the display adapters, then identify which graphics driver is no longer being used.
  3. Right-click the graphics adapter and select the uninstall option.

Reboot your computer and see if the issue has been fixed. Hopefully by this time, you are now able to play the game without any issue. If you are confused with any particular step, feel free to watch and follow the video tutorial below and let me know your feedbacks in the comments section down below!

Video Tutorial


How to fix Valorant error code 68

In this article I’ll show you how you can fix Valorant error code 68 with the possible methods / solutions!

Fix Valorant Error Code 68

This guide will practically address the particular error, “Valorant has encountered a connection error, please re-launch the game” with the error code 68 shown along with this error window. A lot of players reported that they are experiencing Error Code 68 that pops out randomly during matches or while in-game. Error Code 68 is one of the many annoying error codes in Valorant.

There are possible various causes for this particular error and so carefully follow along the video tutorial or the text guide written below to get this problem fixed.

Video Tutorial

Step-By-Step Guide

Solution #1: Add Valorant to Firewall Exception

The first possible fix for Valorant error code 68 is to add valorant to firewall exception.

Open up Start Menu and search for Firewall & Network Protection and open it up.

valorant-error-code-68-allow-to-firewall-1

Click on the Allow an app through Firewall and click on the Change Settings button with the administrator shield icon.

valorant-error-code-68-allow-to-firewall-2
valorant-error-code-68-allow-to-firewall-3

Click on Allow another app button then browse for your Valorant shortcut file on desktop. Select the shortcut file and hit open button. It will add an app called RiotClientServices.

valorant-error-code-68-allow-to-firewall-4

Then add another app then navigate to your Valorant installation path. Open up the Valorant Folder.

valorant-error-code-68-allow-to-firewall-5

Open the live folder and add the Valorant.exe application to the firewall.

valorant-error-code-68-allow-to-firewall-6

This will add an app called BootstrapPackagedGame, and make sure that it is allowed for both private and public networks.

valorant-error-code-68-allow-to-firewall-7

Allow another app one last time, while on the same path navigate through Valorant Installation Path – “Valorant/live/shootergame/binaries/win64/” and then add the VALORANT-Win64-Shipping.exe to the exceptions.

valorant-error-code-68-allow-to-firewall-8
valorant-error-code-68-allow-to-firewall-9
valorant-error-code-68-allow-to-firewall-10

Be sure to have the rules for Valorant, BootstrapPackagedGame and RiotClientServices apps to be allowed both for private and public networks by ticking the respective checkboxes.

Solution #2: Change DNS on Windows

Another step that we can do to fix valorant error code 68 is to change dns on Windows.

valorant-error-code-68-change-dns-fix-1

Right click on your Windows network icon or wifi icon and click on Open Network & Internet Settings.

valorant-error-code-68-change-dns-fix-2

Click on Change adapter options then right click your network or wifi adapter click on properties.

valorant-error-code-68-change-dns-fix-3

Find Internet Protocol Version 4 (TCP/IPv4) then click on properties.

valorant-error-code-68-change-dns-fix-4

Click on the Use the following DNS addresses automatically. and enter the following respectively:

Preferred DNS Server: 1.1.1.1

Alternate DNS Server: 8.8.4.4

Save all the changes and restart your computer.

Solution #3: Use VPN Temporarily to play Valorant

Lastly, if all solution fails, try using a vpn and see if the valorant error code 68 gets fixed.

There had been reports that Valorant has some issues with routing with different ISPs as of the moment hence one way to temporarily address this concern rather than wait till it gets fixed by riot is to use VPN.

Signup for a free account (3-servers available for free) then download and install ProtonVPN.

valorant-error-code-68-fix-use-vpn

After installation, run the VPN and try playing the game if you still encounter error code 68.

Related Articles


How to fix Valorant error code 138 connection error

Learn how to fix Valorant error code 138 connection error easily with all the possible fix or solution. Valorant error code 138 can be fixed by these methods.

This error are reported to be occurring just recently with lower-end computers and so I have compiled the possible solutions SO FAR for this particular error code 138 connection error in Valorant.

Follow along on the video tutorial below or read through the step-by-step guide below.

Video Tutorial(s)

Step-by-Step Guide

Solution 1: Bcdedit Configurations

The first solution to fix error code 138 on Valorant is to apply some bcdedit configurations.

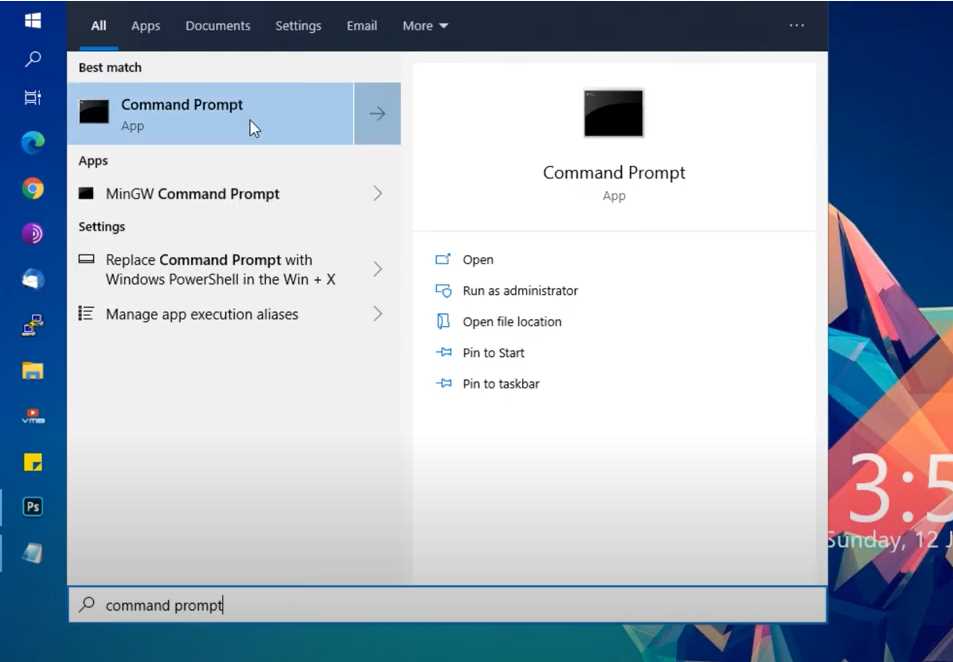
Open up a command prompt by going to your start menu and look for “Command Prompt” and make sure to run it as administrator.

valorant-connection-error-code-138-open-command-prompt

Type in the following codes:

bcdedit.exe /set {current} nx OptIn
bcdedit.exe /set testsigning off
bcdedit.exe /set nointegritychecks off

Note: If you experience “The value is protected by Secure Boot policy and cannot be modified or deleted” make sure to turn off first your secure boot option on your BIOS.

Next, restart your computer and check if Valorant is now working properly.

Otherwise, continue with the other possible fixes below.

Solution 2: Set Compatibility to Windows 8

Another solution to fix the error code 138 on Valorant is to Set the Compatibility to Windows 8.

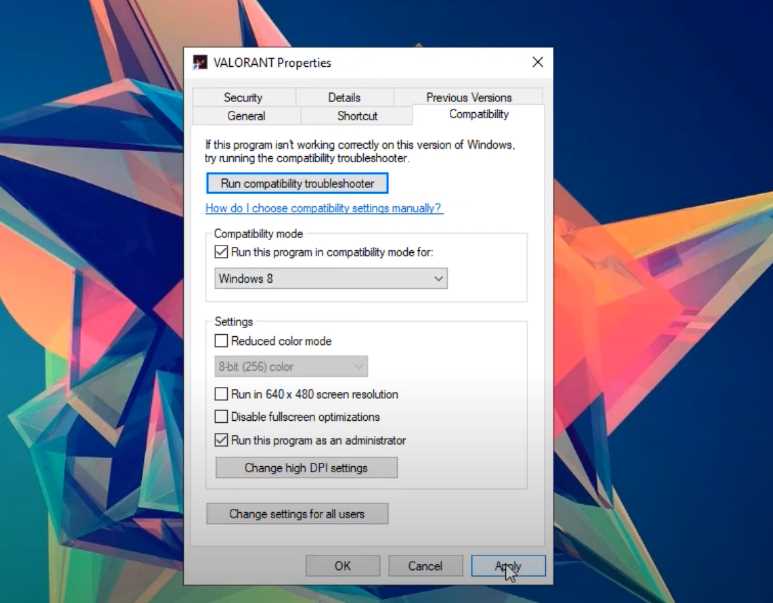
Locate your Valorant shortcut icon on your desktop or start menu.

Right click on the shortcut and go to properties.

Check the “Run this program in compatibility mode for: Windows 8” and check the Run this program as an administrator. Hit the apply and ok button.

valorant-connection-error-code-138-set-compatibility-windows-8

Solution 3: Set VGC Process Priority to “Normal”

Another solution that you can try to fix error code 138 on Valorant is to set the VGC Process Priority to “Normal”.

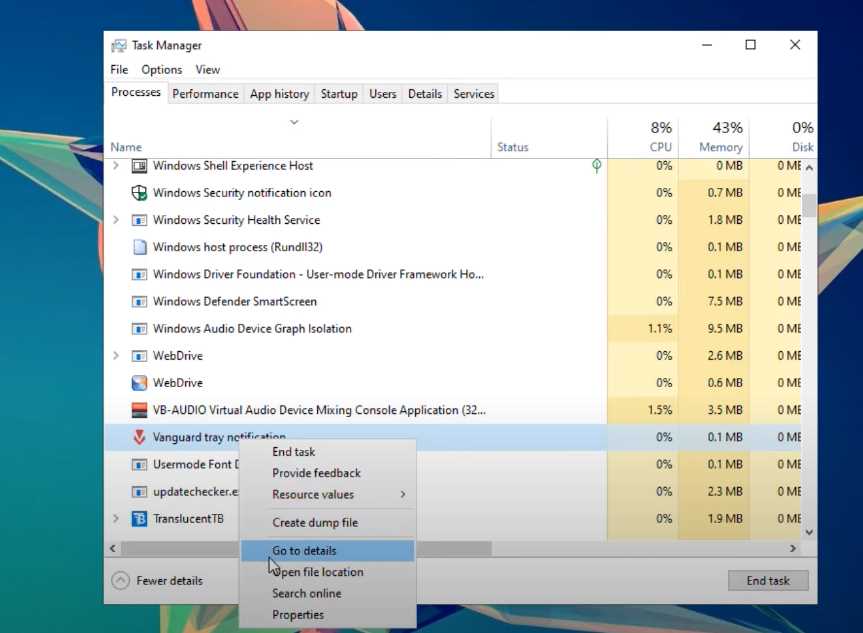
Go ahead and open up task manager and look for the process “Vanguard tray notification” right click on it and click on go to details.

valorant-connection-error-code-138-open-task-manager

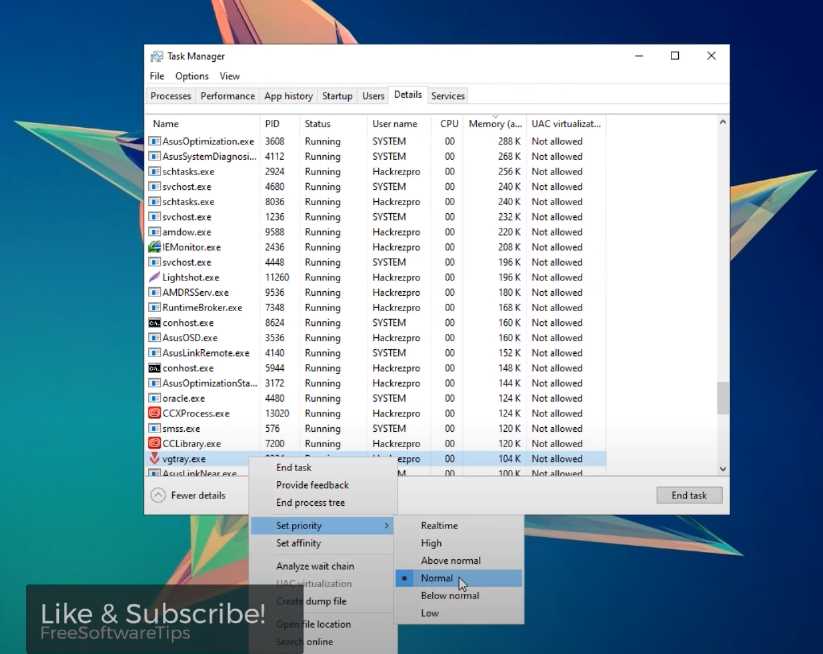
Right click on the process and make sure to set the priority to Normal.

Other possible soluton:

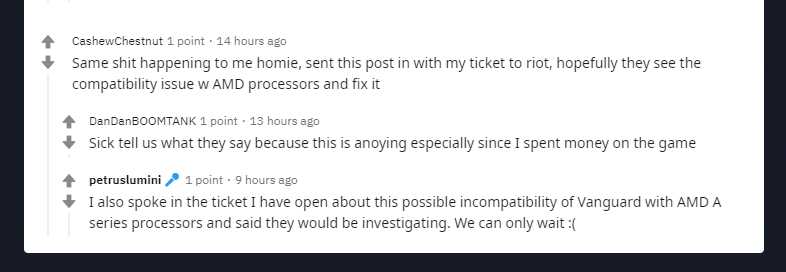
If all else fails and you still get error code on Valorant, kindly check if your processor is AMD A-Series processor such as AMD A6, A10, and so on. there had been reports that the Valorant’s Vanguard Anti-cheat system has a particular conflict / issue with these processors and also some other unnamed processors.

Riot is investigating the matter as of the moment and so if nothing fixed your problem and it still shows up error code 138, you’ll have to wait for a patch from Riot to address this issue.

Reddit thread Source

Related Articles


How to quickly enable fps and ping counter in Valorant

Learn how you can quickly enable fps and ping counter in Valorant!

In this article, If you’ve been an old-time FPS player before you will know how important it is to have the FPS and Network Latency / Ping shown right on your screen!

If you are just starting out, well it’s never too late to learn!

I have included in this article a video tutorial to demonstrate the steps or you can just read through the steps written right below it.

Video Tutorial

Steps to Enable Ping & Fps in Valorant

  1. Open up the game, and upon entering the lobby click on the gear icon on the top-right most portion of the screen.
  2. Click on settings. You’ll be taken to General tab by default go to Video Settings.
  3. While on the Video Settings, you will be shown with another 3 options.
  4. Open up the stats under the Video Settings.
  5. Enable “Client FPS” to show game fps and for the ping the options that you can enable are “Server Tick Rate”, “Network Round Trip Time” and “Packet Loss”.

Related Articles


How to limit wifi / lan users on PLDT Fibr Router (NO QOS)

Learn how you can limit wifi / lan users on PLDT Fibr Router without the need of QOS.

In this article, I included a video tutorial to demonstrate the needed steps to do this kind of feature on your laptop / desktop without the need of router QOS.

Video Tutorial

Download Arcai-Net Cut

Steps & Guide

Step (1/5): Enable telnet switch using fiberhomesuperadmin account.

PLDT Fibr Superadmin Credentials (2020): Click here

Step (2/5): Enable telnet Client on Windows

Step (3/5): Disable AP Isolation Telnet Credentials: Username: gepon or gpon Password gepon or gpon Command to be used: control port_fw_eligiblity_switch disable

Note: If you experience unkown command on Telnet you can SKIP this part and continue to STEP 4 & 5.

Step (4/5): Install Arcai Netcut on Windows or Android (Download Link Above)

Step (5/5): Configure / limit speeds of users! http://www.arcai.com/netCut/s/


Windows 10 Update Service is missing solution | 2020

In this tutorial, I’ll be showing you how to fix the Windows 10 Update Service is missing issue on Windows Updates.

This issue prevents windows update to check and install security and feature updates on your computer due to some corrupted registry keys and values and may also be due to disabled essential windows update services.

Video Tutorial

Download WUAUServFix10 Registry


Fix Windows 10/8/7 Slow Right-Click or Right-Click takes forever to load (2020)

Tired of endlessly waiting for your right click to load? Here comes the savior!

Windows Slow Right Click Problem

Windows Right-Click tend to slow down when the shell context menu on windows gets bombarded with apps.

In order to remove the context menu items or entries on Windows 10, 8, or 7 you can open up a registry editor and delete their respective entries manually.

The downside of doing these manually is that when you delete accidentally a folder or a registry entry there’s no going back or it is very difficult to undo those actions.

However I will be showing you a better method by using a simple app called “ShellExView” to do that process much easier and much faster.

Follow along on the video tutorial below or the step-by-step guide to fix your Windows right click menu in no time!

Video Tutorial

Download ShellExView

Fix Slow Right-click on Windows (Steps)

  1. Download the appropriate version of ShellExView posted above (32 bit or 64 bit).
  2. Next, Extract ShellExView on any folder or location. Eg. Desktop
  3. Open up shexview application upon extraction.
  4. Go to options > check the option “Hide all Microsoft Extensions”.
  5. Select all extensions (shortcut Ctrl + A) then disable them by clicking on the red button on the top left of the application.
  6. Go to options > Restart Windows Explorer.
  7. Hit the yes button and check if the problem is now fixed!


TikTok may be banned soon in the United States along with other Chinese Social Media Apps

TikTok may be banned anytime soon in the United States along with other Chinese Social Media Apps according to the recent statement by Pompeo.

The United States is considering banning the popular video sharing app “TikTok” along with a number of Chinese social media apps, Secretary of State Mike Pompeo said Monday.

During an interview with Fox News’ Laura Ingraham, Pompeo suggested the possibility of this particular decision.

Ingraham asked Pompeo as to whether the United States should be considering a ban on the popular video sharing platform, “TikTok”, along with other Chinese social media apps.

Tiktok went viral in the United States and other western countries, notably becoming the first Chinese social media app to gain significant amount of attention with users outside of China. The app was downloaded 315 million times in the first three months of this year.

Last week, the Indian government said it would ban TikTok along with other Chinese apps with the possible “threat to sovereignty and integrity.” as Tensions between India and China have been escalating after a clash that killed 22 Indian soldiers along the Himalayan border.

Other Related Articles


Warzone leak Counter-UAVS are soon available to Buy Stations

Counter-UAVS killstreak might be game-changer to endless UAV spotting. A new leak reaveals that Call of Duty: Warzone might have a new counter-uavs killstreak available on buy station to prevent enemy uavs

On the recent updates of Call of Duty: Warzone, a Counter UAV feature was added to the game whenever a team uses four UAVs simultaneously.

A new leak however hints that you will no longer buy four UAVs but rather it’ll become a purchasable item just like any other killstreak from a Buy Station anytime soon.

Call of Duty: Warzone players has recently discovered that by using four UAVs simultaneously, a Counter-UAV will take in effect for the enemy teams. The effect results to blocking of the mini-map which could overturn chances of enemy teams to advance into the safe zone since the mini-map is a crucial tactical aspect in Warzone. The cost of four UAVs is $16,000 which is a lot of money especially when you have to keep some for later tactical teammate revives or some handy gas mask.

Players have revealed screenshots of the Counter UAV that they were able to find as a purchasable item in the Buy Station. The Counter UAV killstreak costs $4,500, which is the same price for buying a Self-Revive Kit and $500 more than the regular UAV killstreak.

Players have posted screenshots of the Counter UAV included in the Buy Station as a purchasable item. The killstreak costs $4,500, which is the same amount as a Self-Revive Kit and $500 more than a UAV. 

The killstreak however hasn’t been officially confirmed by Call of Duty developers but it would be a game-changer when it becomes officially available in the Buy Stations.

Related articles


How to surrender in Valorant

Wondered how you can surrender in Valorant? Here’s how!

Due to the growing popularity of Valorant, many players are just struggling to match the opponent’s skills and difficulty. The game itself is more complex that what it may look like on first impression. There are games where the opponents are just way to better than your team and surrendering is the only key to end the endless battle fights.

In response to this, Riot Games has added a surrender feature to Valorant, allowing players to bow down to their opposing team early even before the match is concluded–free of consequences.

How do you Surrender in Valorant?

To surrender in a Valorant match, a player can use either of the three commands into the game-chat. “/surrender”, “/concede”, and “/ff” are all the commands viable to end a game. This will begin a surrender vote, a system that is common in all pro-league games such as League of Legends, in which all teammates will get a notification that a surrender option has been started. Hence, other players on the team can vote yes or no to the surrender using the keys F5 and F6 respectively. Alternatively, players can also vote by typing the “/yes” or “/no” command into the chat. For a surrender vote to pass, each member of the team needs to vote in favor of surrendering the entire match. If a SINGLE player votes no, or no one votes at all then the match will continue.

What do you think about this surrender feature of Valorant?

Related Articles