SEO Tools for Plagiarism is one of the most essential tools for checking quality and originality of content that you are making/publishing. There are paid and free SEO tools for Plagiarism checking out there but I’ll be sharing you the best free SEO tools for plagiarism that performs it’s job properly. It is important to publish quality content articles thus one way of doing so is by making sure that your content is not plagiarized by others.
I will run down the best free SEO Tools for Plagiarism checking so far on this article. So go ahead and check out their advantages, brief review and disadvantages and weigh which one you’d like to keep or use.
Best Free SEO Tools for Plagiarism Checking
The most important thing about these tools is the effectiveness of it’s function which is to detect Plagiarism. I have used quite several plagiarism checker tools however some fails to do it’s job, while some may work better when used in a different scenario compared to the other.
1.Copyscape
One of the most useful, and powerful plagiarism checker tools out there is Copyscape. It offers paid and limited free plagiarism checking features. In the SEO industry, Copyscape proves itself as a trustworthy plagiarism checker tool that performs its job beyond typical. The overall site’s interface and design also looks a little bit out of date comparing it to paid seo tools for plagiarism such as Grammarly, Copyleaks, etc.
To provide a summary, here are the pros and cons of this tool:
Another free and useful SEO tools for plagiarism checking is the Plagiarism detector. Plagiarism detector, unlike Copyscape is entirely free SEO tool which gives you unlimited numbers of queries per day. You can manually insert a text to run the plagiarism detection tool, upload a document file, or even just simply put the website page URL you want to check. The tool despite being free, has also limitations like any other tools out there. You are only limited to a maximum of 1,000 words per queries and if you need more than that, you’ll have to upgrade to its pro version. What I like about this tool is that similar to Copyscape, the detection rate of the tool is quite impressive despite just being a free tool.
Plagiarism detector tool also summarizes up the reports and highlights plagiarized parts of the text along with the links of the possible source in which it got plagiarized.
PROS:
Ability to check document, URL or manually entered text
Unlimited usage per day; No Registration needed
Free; Ability to also check grammars
Good detection capabilities
CONS:
Limited to 1,000 words per query
ADS Supported site (lots of promotion and ads)
Some rephrased/SPUN articles are not detected
You can use this Plagiarism detector by going here.
3. Duplichecker
Duplichecker also deserves a spot in this list of free SEO tools for Plagiarism. This tool is quite similar looking with the Plagiarism detector and also offers identical features. It has the same ability to check using URL, document file or manual text input. Each query is also limited to 1,000 words similar to the Plagiarism detector’s limit.
What makes Duplichecker different is that it has other SEO tools packed along with its free plagiarism checker. Plus, accessing those won’t require you to signup or register for an account. It also has a keyword research tool, backlink tool, long-tail keyword research tool, and so on.
PROS:
Check document, URL or manually entered text for Plagiarism
Unlimited usage; No registration required
Free; Has other useful free SEO tools
CONS:
Average detection capability
1,000 words limit per query
Unable to detect some plagiarized content
ADS Supported site
You can check out Duplichecker along with it’s other tools here.
That’s it so far! That’s the best free SEO tools for Plagiarism which I can recommend and have personally tried. If you have any SEO tool in mind that’s not covered in this article or have any feedbacks or suggestion, feel free to leave a comment below!
Microsoft Flight Simulator 2020 System Requirements
|
You might be thinking that Microsoft Flight Simulator 2020 can only be played on high-end specs machines. However, the latest release of the minimum specifications for Microsoft Flight Simulator 2020 shows reasonable requirements that might even cater to mid-range desktop build.
Here are the latest Microsoft Flight Simulator 2020 system requirements:
MINIMUMSPEC/SYSTEM REQUIREMENTS
RECOMMENDEDSPEC/ SYSTEM REQUIREMENTS
CPU
Intel Core i5-4460 or AMD Ryzen 3 1200 or better
Intel Core i5-8400 or AMD Ryzen 5 1500X or better
RAM
8 GB MEMORY
16 GB MEMORY
Operating System (OS)
WINDOWS 10 64 Bit (1909)
WINDOWS 10 64 Bit (1909)
GPU
Radeon RX 570 or GeForce GTX 770 or better
Radeon RX 590 or GeForce GTX 970
DEDICATED VIDEO MEMORY
2048 MB / 2 GB
4096 MB / 4 GB
VERTEX SHADER
5.0
5.1
PIXEL SHADER
5.0
5.1
DISK SPACE
150 GB
150 GB
Microsoft Flight Simulator 2020 Minimum and Recommended SPEC/System Requirements on PC
The Microsoft Flight Simulator 2020 requires massive amounts of disk space as the initial installation of the game already reached around 120 GB of download (STEAM).
Microsoft Flight Simulator 2020 Ideal Specs / System Requirements
IDEAL SPEC/ SYSTEM REQUIREMENTS
CPU
Ryzen 7 Pro 2700X / Intel i7-9800X
RAM
32 GB
Operating System (OS)
WINDOWS 10 64 Bit (1909)
GPU
Radeon VII / Nvidia RTX 2080
DEDICATED VIDEO MEMORY
8,192 MB / 8 GB
VERTEX SHADER
5.1
PIXEL SHADER
5.1
DISK SPACE
150 GB (SOLID-STATE DRIVE RECOMMENDED)
Microsoft Flight Simulator 2020 IDEAL System Requirements on PC
If Microsoft updates its minimum hardware requirements, we will update the information on this page. The game is now available for purchase in the Microsoft Store. The Microsoft Flight Simulator 2020 Standard retails for $59.99 while the Deluxe costs $89.99 and for the Premium Deluxe edition costs $119.99. (Based from the listing on Microsoft Store; as of August 22, 2020)
How to Improve Your Google Meet Video Quality
|
In this article, I’ll be showing you the ultimate guide that you’ll ever need to improve Google Meet video quality.
I will be giving you practical and useful tips to improve, diagnose and provide a solution when experiencing bad video quality when using Google Meet.
1. Change Send & Receive Quality to improve Google Meet Video Quality
If you are seeing blurry pixels, choppy audio even if you have a good internet connection, one possible cause for this terrible Google Meet video quality is that you or the people connected on your Google Meet session might have set their send and receive quality to 360p.
To change this video quality setting, it is very simple. If you’re not yet inside a Google Meet room, click on the option on the right bottom-portion of your window that says “More Options”.
Once opened click on Settings > Go to the Video Tab where you will be able to see the send resolution and receive resolution which refers to the video quality that you are uploading and video quality you are receiving from users connected on your Google Meet room.
To improve Google Meet video quality make sure that the setting is set to the highest supported resolution (eg. 720p, 1080p, etc.) depending on your hardware.
Additional note, you must also ask the people inside your Google Meet room to change their corresponding setting (send quality) to improve the video quality that you are receiving for example from your professor.
IMPORTANT NOTE: The Google Meet video quality settings as of this writing automatically resets itself back to the lowest quality (360p) so in each room / meeting you’d have to reconfigure the Google Meet video quality settings to make sure that you are receiving and sending the best video quality.
2. Update Camera/Webcam Drivers
Another practical method that you can try to address Google Meet bad video quality is to update your camera drivers.
Go to your Start Menu and search for Device Manager and then open it up.
Expand the Cameras and then right click your webcam or camera connected on your laptop/desktop then click on the Update driver.
Wait for it to finish updating, the time depends on the size of the update / driver and your internet speed.
3. Configure your Webcam Settings
After making sure that you have the updated driver for your Camera device, next thing that you can do is to configure your webcam settings.
Out of the box, webcams and low-mid range stock cameras tend to have a pretty generic configuration hence manually adjusting them could improve Google Meet video quality.
Go ahead and download OBS Studio and install the app. Open the OBS Studio once launched click on the + icon under the Sources and select “Video capture device”
Then give it any name and hit ok once you’ve decided what to name your webcam/camera device.
Under the Device select your webcam / camera device, click on the configure video and you’ll be shown a window to change Brightness, Contrast, Hue, Saturation, Sharpness, Gamma, and White balance. You can play around with these settings to have the best picture quality depending on your setup and lighting environment.
Recommendation for the Video Proc Amp: If you are using a laptop webcam turning up the sharpness could improve clarity of your webcam.
After adjusting the image settings, go to the Camera Control tab. You’ll be able to see “Low Light Compensation”. If you have this option available, you can turn this one off to improve the webcam / camera frames per second (FPS) to avoid stuttering or motion blurring when moving.
Disabling the Low Light Compensation reduces the amount of work put into your camera device. Although this might cause some darker image quality, it is better to just compensate this by getting a lamp or a small source of light facing towards your window (eg. natural light from windows).
After adjusting the camera properties, hit the apply and ok button and change the following settings:
Set the resolution / fps type -> Custom, Resolution -> Highest Resolution supported by your camera (eg. 720p or 1280×720), FPS -> Highest frame rate supported by your camera (eg. 30), Video Format -> MJPEG.
This will further improve the fps and reduce the “webcammy” feels where your picture creates massive amounts of motion blur when moving due to the lack of FPS.
4. Pause Windows Updates or System Updates
Additionally, you can also try pausing Windows Updates or System Updates on your computer / device to improve google meet bad video quality.
Updates can sometimes hog your speed and bandwidth on your home network.
Disabling these updates temporarily will assure you that this is not the cause of terrible video quality when attending an important meeting on Google Meet.
To disable Windows Updates, go to the Start Menu and search for Windows Update Settings, scroll down and you’ll be able to see the option “Pause updates for 7 days“
To confirm that your windows updates have been successfully paused, scroll up and you’ll be able to see a notification that the updates has been paused.
Alternatively, you can also set your active hours to make sure that Windows will not conduct any updates during these period or time of the day.
To change the active hours, click on the Change Active Hours and set your preferred time.
5. Change your DNS Server to Cloudflare / Google DNS
Although it is uncommon for your DNS server to be the cause of the issue with regards to bad video quality on Google meet, however it is not impossible.
To change your dns server to a more reliable DNS server such as Cloudflare, Google DNS, OpenDNs, etc. look for yournetwork icon on your task bar and right click on it and click on Open Network & Internet Settings.
Click on the Change Adapter Options under the Change Network Settings.
Locate your network adapter (WiFi / Ethernet Adapter) and right click on it and click on Properties.
Look for the Internet Protocol Version 4 (IPv4) entry and click on it and then click the Properties button. Select the Use the following DNS Server addresses option and enter the following.
Once done, go ahead and restart your computer to apply all the recent DNS changes you’ve made.
6. Try to use modern web browsers
Consider also using modern web browsers if you haven’t just yet. Google Meet mostly runs through web browsers thus having a modern and up-to-date browser will improve video and audio clarity of calls or meetings inside Google Meet.
Some examples of modern web browsers are Google Chrome, Microsoft Edge (Chromium), Firefox, Opera, and many more! Here are the their respective download pages.
If you’re already using one of the many modern web browsers, you can try checking if you have the latest version / updated version of the browser.
For Microsoft Edge go the top-right portion of your screen and you’ll be able to see a Settings Menu icon expand that one go Help and Feedback and click on About Microsoft Edge.
Typically, it will automatically check for updates that says “Checking for updates” when opening this window.
If you’re browser is up=to=date it will show you a message that your browser is up-to-date.
7. Check your internet speed / connection
After doing all the optimization possible, yet you still experience terrible video quality on Google Meet, I suggest you to check your internet connection.
To check your internet speed, you can run a download and upload speed tests that will show you the current speed of your network as well as it’s latency.
Go to speedtest.net, then click on the Go button. Once the tests are finished (typically 1-3 minutes) it will show you three things. Ping (Latency), Download Speed and Upload Speed.
To interpret this, a good quality internet connection must have low Ping or latency and have both high download and upload speeds.
In the snapshot of my speed test, the ping / latency is 361ms which is higher than normal hence it will cause delays / lags / stuttering when receiving and sending video during a Google Meet conference.
Typically a Fiber connection must only have 10-60 ms, a wired DSL/Cable internet must have only less than 100ms and wireless LTE networks are typically at around 120ms and below.
The download speed will affect the quality that you RECEIVE from the people talking / broadcasting their video inside a Google Meeting.
The upload speed will affect the quality of your video and audio being sent to the people connecting inside your Google Meeting.
The photo / snapshot above shows you a slow network since the ping is higher than normal (should only be around 10-40ms) and the upload speed is lower than normal (fibr must have symmetrical upload and download speeds).
8. Upgrade your internet connection
So you’ve reached the end of this list, and yet still you haven’t improved your Google Meet video quality, my last suggestion is to find a better internet service provider or upgrade from your existing plan.
If you are offered between Fiber, DSL/Cable, and Wireless LTE plans always choose Fiber plan over any other as it is the latest technology that offers high quality internet connection.
An emerging technology called 5G service is also another possible option however due to the fact that it is not yet widely available, your best option is to choose Fiber internet or if no facilities can accommodate you try Cable internet, or LTE Wireless internet and least recommended is the DSL internet.
You can check the 5G coverage in this OOKLA 5G Map if you’re area is already 5G ready then you can start inquiring for this newest technology that allows you to connect at fiber fast speeds wirelessly.
Ultimate Guide: How to fix Wifi / Packet Loss / Slow Internet
|
In this article, I’ll show you the ultimate guide in fixing common wifi problems such as packet loss, intermittent Wifi connection and overall slow internet speed. There could be a number of possible common fixes or solution for this broad area of concern hopefully one will help fix your wifi network to get back up and running as optimal as possible.
1. Slow Wifi / Slow Internet
Devices connected on your wifi router share the same so called bandwidth/speed on your network. Each users that browse a website, stream a video on YouTube or watch Netflix consume download and upload speed.
To check your current download and upload speed to diagnose this issue, you can conduct a speed test using these popular sites:
In the article of Nicole George “Frequently asked questions on internet speeds — What speed do you need?“, the recommended speed by the Federal Communications Commissions (FCC) recommends speeds of 12-25 Mbps for families that have multiple internet users or for frequent online streaming.
With that being said, after running the speedtests by either from OOkla or Fast.com tests, you can check whether you are getting sufficient internet speeds. If you’re not getting the recommended wifi speed try the following:
The Quick Fix for Slow Wi-Fi Internet Speeds:
Try disconnecting all devices first connected on your Wi-Fi network.
Restart your modem for (15-30 seconds) to refresh the IP configuration.
Close any downloads, updates, or disable smartphone updates.
Check if there are any unauthorized devices connected on your router (typically routers have a webpage interface where you can check the connected list of devices)
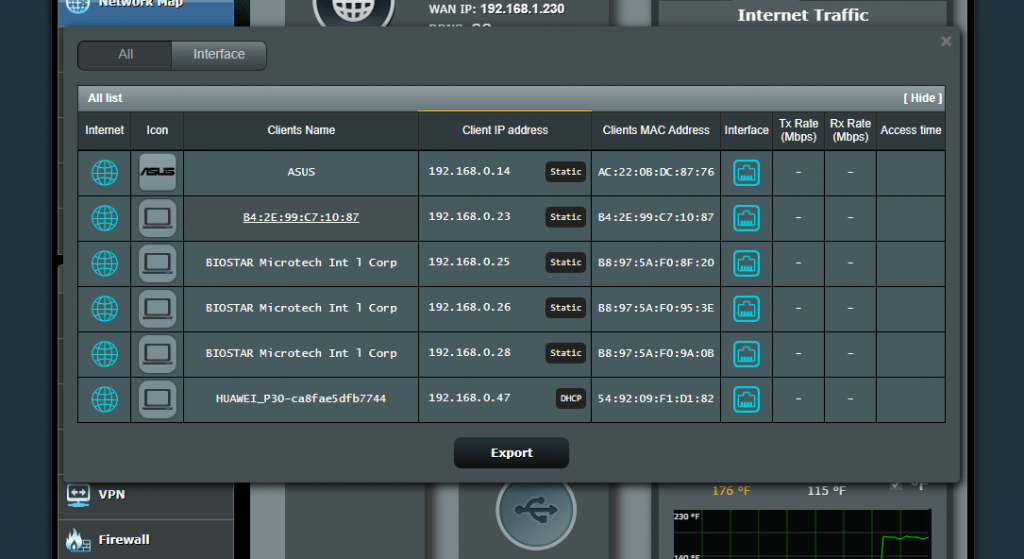
All Connected Clients on a ASUS RTN18-U Router
If all above fails, you can try contacting your Internet Service Provider (ISP) and ask them if they are conducting any maintenance, or having network issues that may be the cause of your slow Wi-Fi speed issue.
2. DNS Server is Not Responding
Two common things may cause this issue that pops up on your Windows computer “DNS Server is not responding” either your ISP network default DNS server went offline or you have a misconfigured custom DNS server set on your network.
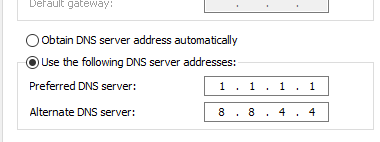
To fix this: You can go to your taskbar, right-click your Network Icon > Open Network & Internet Settings, click on Change Adapter Options and locate your network adapter / wifi adapter then right click on it and click on Properties. Look for the Internet Protocol Version 4 (IPv4) and click on properties. If you have the “Obtain DNS server address automatically” checked, try choosing the “Use the following DNS Server addresses” and enter the following:
Preferred DNS: Cloudflare Alternate DNS: Google DNS
And hit the ok button and restart your computer. However if you have an existing records under that particular option and you get the DNS Server is Not Responding error, try the other way around and select the “Obtain DNS Server address automatically” and restart your computer.
3. Wifi Keeps Disconnecting
One common cause of this particular wifi issue is an overlapping wifi channel on your area. Having overlapping Wi-Fi channels can result to intermittent wifi connection hence there are three common ways to fix this issue.
To fix this: First, you can try simple restarting your router. Turn off your router for at least 1 minute before turning it back up. Restarting your router will result to a configuration “refresh” wherein your router may try to find a different wifi channel to broadcast your wifi ssid to prevent interference between networks.
If that didn’t work, you can try manually moving your wifi router if that permits you to move your router and see if that fixes the issue.
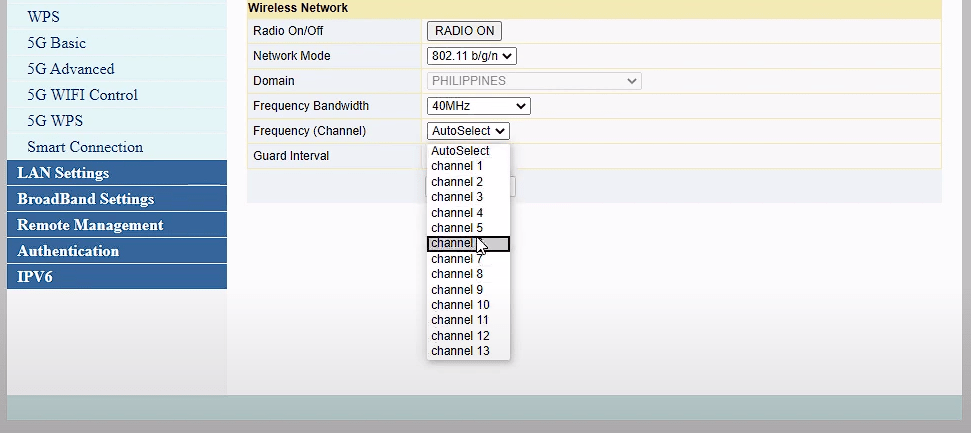
Otherwise, you can configure manually your wifi network (2.4Ghz or 5Ghz) wifi to use a specific channel only either 1,6 or 11 channel to prevent any overlapping frequency with other networks. Also, if you are in a congested area try keeping the frequency bandwidth to only 20 MHz.
Wifi Frenquency Channel Configuration – AN5506-04-FA ONU Fibr Router
4. Some Websites Don’t Load
Websites can sometimes fail to load due to various limitations set by your ISP, system configuration or country-wide restrictions.
Quick Fix: To quickly troubleshoot and fix this wifi problem, try changing first the DNS settings on your computer as shown in the 2nd step on this article. Go to your taskbar, right-click your Network Icon > Open Network & Internet Settings, click on Change Adapter Options and locate your network adapter / wifi adapter then right click on it and click on Properties. Look for the Internet Protocol Version 4 (IPv4) and click on properties. If you have the “Obtain DNS server address automatically” checked, try choosing the “Use the following DNS Server addresses” and enter the following:
Preferred DNS: Cloudflare Alternate DNS: Google DNS
Once done, close everything up and open up a command prompt by going to your start menu and search for Command Prompt and right click on it and run it as administrator.
Type in the command:
ipconfig /flushdns
Restart your computer, and see if that fixes your problem. If that wouldn’t still fix websites not loading up on your network, another thing that you can try is to use free VPN services. VPN or Virtual Private Networks masks your IP address to prevent internet censorship (eg. Website blocking, and ISP site monitoring, etc) and see if that fixes your problem.
If none fixed your problem, you can check if the website itself is offline for everyone using the this tool.
TikTok may be banned soon in the United States along with other Chinese Social Media Apps
|
TikTok may be banned anytime soon in the United States along with other Chinese Social Media Apps according to the recent statement by Pompeo.
The United States is considering banning the popular video sharing app “TikTok” along with a number of Chinese social media apps, Secretary of State Mike Pompeo said Monday.
During an interview with Fox News’ Laura Ingraham, Pompeo suggested the possibility of this particular decision.
Ingraham asked Pompeo as to whether the United States should be considering a ban on the popular video sharing platform, “TikTok”, along with other Chinese social media apps.
Tiktok went viral in the United States and other western countries, notably becoming the first Chinese social media app to gain significant amount of attention with users outside of China. The app was downloaded 315 million times in the first three months of this year.
Last week, the Indian government said it would ban TikTok along with other Chinese apps with the possible “threat to sovereignty and integrity.” as Tensions between India and China have been escalating after a clash that killed 22 Indian soldiers along the Himalayan border.
Warzone leak Counter-UAVS are soon available to Buy Stations
|
Counter-UAVS killstreak might be game-changer to endless UAV spotting. A new leak reaveals that Call of Duty: Warzone might have a new counter-uavs killstreak available on buy station to prevent enemy uavs
On the recent updates of Call of Duty: Warzone, a Counter UAV feature was added to the game whenever a team uses four UAVs simultaneously.
A new leak however hints that you will no longer buy four UAVs but rather it’ll become a purchasable item just like any other killstreak from a Buy Station anytime soon.
Call of Duty: Warzone players has recently discovered that by using four UAVs simultaneously, a Counter-UAV will take in effect for the enemy teams. The effect results to blocking of the mini-map which could overturn chances of enemy teams to advance into the safe zone since the mini-map is a crucial tactical aspect in Warzone. The cost of four UAVs is $16,000 which is a lot of money especially when you have to keep some for later tactical teammate revives or some handy gas mask.
Players have revealed screenshots of the Counter UAV that they were able to find as a purchasable item in the Buy Station. The Counter UAV killstreak costs $4,500, which is the same price for buying a Self-Revive Kit and $500 more than the regular UAV killstreak.
Players have posted screenshots of the Counter UAV included in the Buy Station as a purchasable item. The killstreak costs $4,500, which is the same amount as a Self-Revive Kit and $500 more than a UAV.
The killstreak however hasn’t been officially confirmed by Call of Duty developers but it would be a game-changer when it becomes officially available in the Buy Stations.
Wondered how you can surrender in Valorant? Here’s how!
Due to the growing popularity of Valorant, many players are just struggling to match the opponent’s skills and difficulty. The game itself is more complex that what it may look like on first impression. There are games where the opponents are just way to better than your team and surrendering is the only key to end the endless battle fights.
In response to this, Riot Games has added a surrender feature to Valorant, allowing players to bow down to their opposing team early even before the match is concluded–free of consequences.
How do you Surrender in Valorant?
To surrender in a Valorant match, a player can use either of the three commands into the game-chat. “/surrender”, “/concede”, and “/ff” are all the commands viable to end a game. This will begin a surrender vote, a system that is common in all pro-league games such as League of Legends, in which all teammates will get a notification that a surrender option has been started. Hence, other players on the team can vote yes or no to the surrender using the keys F5 and F6 respectively. Alternatively, players can also vote by typing the “/yes” or “/no” command into the chat. For a surrender vote to pass, each member of the team needs to vote in favor of surrendering the entire match. If a SINGLE player votes no, or no one votes at all then the match will continue.
What do you think about this surrender feature of Valorant?
Grab your forever copy before July 9 on Epic Games Store! Hue, a puzzle-adventure game is now this week’s free game offered by Epic Games following the previous release of AER Memories of Old and Stranger Things 3.
Hue is a vibrant, award-winning puzzle-adventure, where you alter the world by changing its background colour.
Interesting enough? Hue was published on the year August 03, 2016 by Fiddlesticks Games. The game was designed by Henry Hoffman and Dan Da Rocha. It was released initially on Microsoft Windows, PlayStation 4, and Xbox One, platforms and later released on November 29, 2016 for PlayStation Vita
Microsoft Physical Store announces permanent closure
|
On June 26, 2020, Microsoft has decided to take down all of its physical retail stores across the United States and even abroad. This closure will be shifting Microsoft’s focus into the digital world, Microsoft.com, an online web-store where customers can purchase products, get technical support, and online training through training videos and articles.
Due to the coronavirus outbreak in March, Microsoft had closed down its retail stores but had not started reopening them as Apple had started reopening its physical retail stores.
The company will “reenvision” four locations — in London, New York City, Sydney, and Redmond — as Microsoft Experience Centers but those branches won’t sell merchandise.
Microsoft has mentioned that they will be training and transitioning their staff into working remotely to cater to the demands of the shift from the traditional physical store into a fully-digitalized store.
“Our retail team members will continue to serve customers working from Microsoft corporate facilities or remotely and we will continue to develop our diverse team in support of the overall company mission and objectives,” said Microsoft corporate vice president David Porter.
100+ Android apps that MUST be DELETED – they could be spying on you
|
All of these apps are found out to be from the same developer which could turn easily your beauty camera app into a spy camera.
A recent study and investigation by CyberNews was able to find a link between a secret network of 27 app developers who have created around 103 apps that has around 69 million installations. Most of these apps shares the same behavior and even the same codes.
The strategy of this secret network of developers involves copying other apps and modifying their visual appearance such as interface, logo, and overall design to make the app look unique and to hide their dirty work, they launch the apps under various developer’s names.
CyberNews estimates that the revenue for the apps created by this network could be nearly $1 million per month.
Dangerous Android apps
You might say, I see nothing wrong about a network of developers working together to make bunch of apps right? Not so fast.
The investigation of CyberNews shows that these apps are asking extensive variety of unnecessary device permissions, which is not involved nor used in the core functionalities of the apps. Some of which permissions are modifying or deleting USB storage, turning your mobile’s microphone on and off, accessing your device’s camera and pictures and even modifying system settings.
At first, to a simple android user, these permissions might not be suspicious backed up by the number of installations of the apps and “credibility” since it’s under the official app store. However, in time the developers could abuse these permissions and turn your favorite app locker app, beauty app, camera or even a simple relax sound sleep music player into a bogus data-collecting app.
List of Malicious Apps
The list of the 103 apps that are found to be malicious could potentially spy on you that are listed by CyberNews is located below.
Glitch Effect Video, Photo Editor Grainy Effect
Mod for Minecraft, Mods For Minecraft Animals 2019
Voice Changer, Voice Recorder Editor With Effects
Sketch Photo Editor And Pencil Sketch Art
Horoscope 2019With 12 Zodiac Sign Master
Alex Joe Face Makeup Camera & Beauty Photo Makeup Editor
Arrow Frankie Video Editor With Music App, Video Maker Of Photo
Call Recorder Automatic, Call Recording 2 Ways
Rusty Mari Screen Recorder With Facecam & Audio, Video Editor
Nucie Cam: Beauty Selfie Camera With Photo Editor
Screen Recorder With Facecam & Screenshot Capture
PDF Scanner Camera Scanner: JPG To PDF Converter
App Locker Fingerprint, PIN And Gallery Locker
Photo Collage Maker And Picture Grid Art Frame
Metronome And Tuner For Instrument
Relax Sound Sleep Music And Soothing Sounds
Cut And Paste Photo Editor With Background Eraser
Screen Recorder With Audio And Facecam, Screenshot
App Locker With Password Fingerprint, Lock Gallery
Video Maker With Music Photos, Video Effects App
Photo Collage Maker And Picture Grid, Photo Layout
Video Editor, Video Maker With Music Photos & Text
Makeup Camera and Beauty Makeover Photo Editor
Video Editor With Music And Effects & Video Maker
Cut And Paste Photo Editor To Change Background
Screen Recorder, Game Recorder With Facecam, Audio
JPG To PDF Converter With Camera Scanner To PDF
Bubble Level Ruler With Inclinometer Free
RAR File Extractor And ZIP Opener, ZIP RAR Creator
Automatic Call Recorder Incoming And Outgoing App
App Locker With Password, Photo Gallery Locker
Color Call Screen Themes With Flash On Call
Glitch Effect Video Editor And Vhs Effect Photo
Internet Browser Private To Download Videos HD
Dual Account Double Space, Multi Account App
Alarm Pill Reminder, Medical Reminder And Tracker
Pixel Art Color By Number & Sandbox Coloring Game
Period Tracker, Menstruation & Ovulation Calendar
Kylian Mbapee Call Screen Themes With Flashlight On Call
App Locker Fingerprint & Password, Gallery Locker
ProCam – HD Camera
Video Player All Format 2019 With Media Player App
Photo Collage Maker And Photo Grid 2019 New
Video Editor Of Photos, Video Recorder With Music
MP3 Music Player, MP3 Cutter Ringtones Maker
Beauty Camera, Makeup Photo Editor And Makeover
PIP Photo Editor With PIP Camera Photo Maker 2019
School Hairstyles Step By Step, Braiding Hairstyle
Pixel Art Color By Number 2019 & Sandbox Coloring
Jigsaw Puzzles For Adults And Picture Puzzles
Flower Drawing Step By Step With Mandala Coloring
Photo Editor With Square Blur Pic, Slim Body
Vlog Editor And Video Maker With Music Photos
Battery Charger With Battery Saver And Optimizer
Memory Booster And Cleaner With Ram Optimizer
Volume Booster and Equalizer, MP3 Music Player
Phone Cooler Master And CPU Cooling 2020
Fruit VPN – Better Connect
Kiwi VPN Connection For IP Changer, Unblock Sites
Carrie Waters Volume Booster & Sound Enhancer Music Player
Internet Speed Test Meter And WiFi Test Speed
Perfect VPN Proxy To Unblock Sites With IP Changer
Data Saver And Data Manager To Control Data Usage
GoFox – Incognito Browser And Private Web Browser
Darry Cowlly Running Tracker With Step Counter And Calories
Buttocks Workout: 30 Day Workout & Diet Challenge
Gaspard Aden Automatic Call Recorder Both Sides To Record Calls
App Locker With Password Fingerprint, Lock Pattern
Alfred Persen Volume Booster Music Player And Sound Booster
QR Code Scanner & Barcode Reader, Product Checker
Assistive Touch: Easy Touch With Control Center
Voice Recorder And Editor With Cut Recorded Audio
Video Slideshow With Music And Photos, Video Maker