1

How to Fix Valorant vcruntime140.dll Missing Error

Learn how to fix Valorant vcruntime140.dll missing error with our compiled steps and tutorials that would fix this issue.

Valorant has been giving out lots of error codes which fortunately most of them have a corresponding workaround. However, just recently, reports from players hinted this new kind of problem that is related with the dll on our system. Stick around in this article and follow through our troubleshooting instructions to be able to fix Valorant vcruntime140.dll Missing Error and be able to get back playing the game!

This DLL problem in Valorant is common not only in the game but also in other applications that depend on this particular runtime dll component on Windows. Good news is, there are various ways on how you can fix this kind of issue in Valorant!

Fix Valorant Vcruntime140.dll Missing Error

The solutions that will be shown in this article might or might not work on your end. Hence, we recommend to try out each and every solution that are listed on this guide or follow through our video tutorial if you find anything confusing! You might think why not just simply download vc runtime DLL and place it on the game directory of Valorant? This might work but it’s not the proper way of installing this DLL component on Windows hence the error might still occur even on other software, games and applications so better do the fix right in the first place.

Solution #1: Enable/Install .NET Framework 3.5 (includes 2.0 and 3.0)

Before installing any other pre-requisite, it is best to ensure that the .NET Framework 3.5 (including 2.0 and 3.0) are enabled/installed on your Windows since by default, Windows 10 no longer have these frameworks installed along upon the initial installation of the Operating System.

To enable the .NET Framework 3.5, simply follow these instructions:

Enable using Programs & Features .NET Framework 3.5 (including 2.0 and 3.0)

  1. Go to Start Meu > Search for Control Panel.
  2. Open Programs > Programs and Features.
  3. Click on the Turn Windows features on or off on the top left pane.
  4. Tick the “.NET Framework 3.5 (includes 2.0 and 3.0)
  5. Hit the OK button to apply and install .NET Framework.
    • Note: You need to have a working internet connection to be able to install .NET Framework.

Solution #2: Reinstall Visual Studio 2015 C++ Redistributable

After enabling the .NET Framework 3.5, you might still encounter the same error. However, it is best to have .NET Framework 3.5 installed first before proceeding with this solution to make sure that you will be able to install the Visual Studio 2015 C++ Redistributable component.

To install Visual Studio 2015 C++ Redistributable, follow these steps:

  1. Download Visual Studio 2015 C++ from Microsoft.
  2. Get both the x86: vc_redist.x86.exe and x64: vc_redist.x64.exe.
  3. After downloading both installers, proceed and install the two redist installers one at a time.
  4. Follow along the instructions shown in the screen.
  5. After installing, restart your computer, and re-launch Valorant.

Hopefully that would fix Valorant vcruntime140.dll missing error and you’ll be able to play the game now!

Solution #3: Re-register Valorant vcruntime140.dll component using CMD

If in any case that even after installing the Visual Studio 2015 C++ Redistributable and you still get the same error on Valorant, one solution that might fix this problem is to de-register and re-register the VCRuntime140.dll component on your system.

To do so, follow these steps:

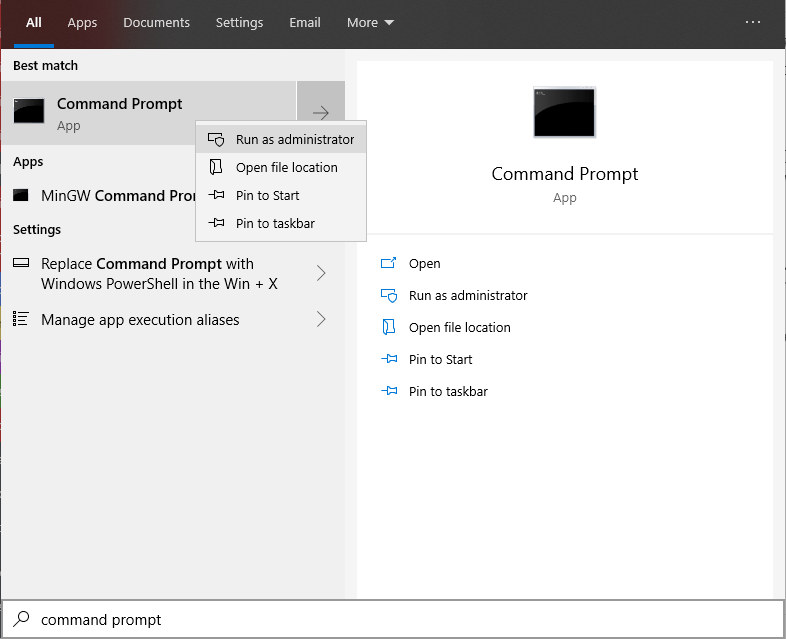
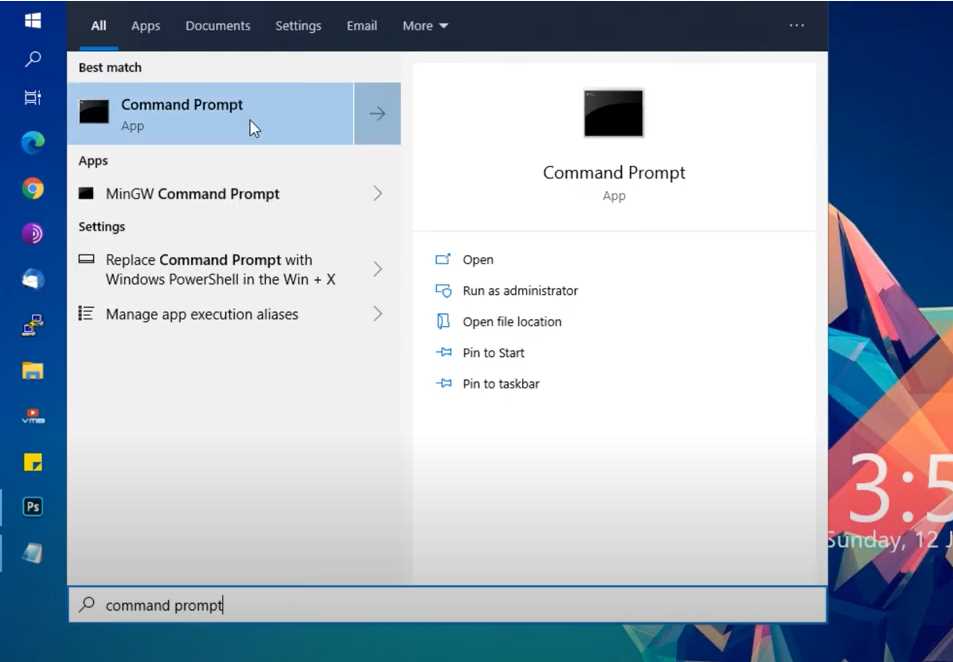
  1. Open the Start Menu > Search for “Command Prompt
  2. Right-click the Command Prompt on the results > click Run as Administrator.
  3. Enter these commands to de-register and re-register the dll component on your system:
    • De-Register: regsvr32 /u VCRUNTIME140.dll
    • Re-Register: regsvr32 VCRUNTIME140.dll
  4. Restart your computer and see if that worked!

Hopefully at this part, you are now able to play and launch Valorant! If still in any case, you’re unable to play Valorant and still experience the vcruntime140.dll error, try these next steps.

Solution #4: Run System File Checker Tool

If you’re still unable to fix the problem in Valorant, there could possibly be a corruption on your system or Windows. One way to make sure that your operating system files and components are properly installed and are working properly, you can run the System File Checker (SFC) Tool.

To run this tool, follow through these instructions:

  1. Open the Start Menu > Search for Command Prompt
  2. Run the command: sfc /scannow
  3. Wait for it to complete, restart your computer once done.

After that, try running the game and hopefully Valorant is now working properly!

Hopefully these solutions would be able to help you out and at least one of these solutions would work for you and fix Valorant vcruntime140.dll missing error. Leave your comments and feedback below let me know if this worked our for you! Also, again, feel free to watch and follow the video tutorial if any of these parts are confusing for you!


Fix Valorant Error Code 57: Vanguard is not initialized

Valorant has officially another new error code on the list. Learn how you can fix Valorant error code 57: “Vanguard is not intialized” issue when playing the game. This issue is often related with the Riot anti-cheat system called “Vanguard”. There are various ways and methods to fix this particular issue.

One of which is to simply restart your computer. If you’ve tried this basic troubleshooting step, you can try to remove the completely Riot Vanguard Anti-cheat system on your computer and head back and freshly re-install Vanguard.

Video Tutorial

Uninstall Riot Vanguard

The first solution that you can do to fix the Valorant error code 57: Vanguard is not initialized error is to uninstall riot vanguard and properly reinstall it properly.

Go ahead and open up your start menu > search for Command Prompt, right click on it and make sure to click on Run as Administrator.

uninstall-riot-vanguard

Type in the following commands:

  • sc delete vgc
  • sc delete vgk
service delete command prompt
serv

Then restart your computer.

Next, go to your C:\ drive or the drive where your Windows is installed. Navigate to Program Files folder and look for Riot Vanguard folder and right click and delete that folder.

delete riot vanguard folder

After that, right click your Valorant launcher on your desktop and click on Run as administrator.

riot vanguard installation

It will now start automatically to reinstall Riot Vanguard on your computer.

Once done, press the PLAY button and once you see the prompt that “Vanguard is not initialized” press the QUIT button.

Go ahead and restart one more time your computer to initialize the Riot Vanguard services on your computer.

Automatic Startup VGC Service

Another solution that you can try to fix the vanguard is not initialized error code 57 is to make sure that the vgc service is set to automatically start.

Open up start menu > services.msc > right click and run as administrator.

Look for “vgc” service name, then right click and click on properties.

Set the startup type to “Automatic“, then hit the apply button and ok. Then click on the start button if the service isn’t running.

Enable VGC on System Configuration

If everything still fails and yet you still get the error code 57 / vanguard is not initialized error then you can try to check if vgc service is set to run automatically on the system configuration app on Windows.

Open up start menu search for msconfig then right click the app and click on Run as Administrator.

open msconfig

Once opened, go to the Services tab and look for the service called “VGC” and be sure that it is checked.

enable vgc service on msconfig
vgc service enabled on msconfig

Once done, hit the apply and ok button. And restart your computer.

That’s about it! If everything still fails you can check out different related fixes for a different code that might be of help for your problem.

Leave your comments and feedback if this article was useful! Like our Facebook page to get updated with helpful tech related tips & tricks.


How to fix Valorant High Ping Spikes in Philippines / SEA Server

Learn how to fix Valorant High Ping Spikes in Philippines/SEA Server.

In this video-article tutorial, I’ll be showing you how you can address this high ping issue on Valorant especially if you are playing on Philippines, SEA Server or anywhere in ASIA.

I will be showing you 5 methods that could possible fix this issue so follow them carefully by reading through this article or following the video guide below.

Video Tutorial

Fix Valorant High Ping Spikes in SEA Server / Philippines

Valorant Launcher Update Account

Riot may have messed up some settings or configurations on your account that may be causing this high ping issue.

One way to fix this is to click on the update account option on your Valorant Launcher.

Open up the Valorant Launcher and hover your mouse on the small question mark icon.

Click on the update your account, then login your account and proceed with the instructions.

Another solution you can try to fix this is to change DNS on Windows.

Change DNS on Windows Lan/Wifi Adapter

First, to change your dns go to your Windows Taskbar and right click your network icon.

Click on “Open Network and Internet Sharing Settings”.

On the Settings Window, click on the Change Adapter Options.

Right-click your network adapter/wifi adapter click on properties.

Select the Internet Protocol Version 4 (TCP/IPv4) then click on the properties button.

Click on the Use the following DNS server addresses option and enter the following:

Hit ok and close all the windows once done and restart your computer.

Another solution that might fix this issue is to set the Valorant game on High Priority.

Set Valorant to High Priority on Task Manager

Launch first Valorant wait until the game is fully loaded up into the lobby.

Go to your task bar and open up Task Manager.

Right Click Valorant and click on Go to details.

Right click the Valorant-Win64-Shipping and Valorant process and set it to High Priority.

Test and check if that fixes the problem.

Another solution that you can do is to reduce the Max FPS in game.

It has been discussed that lowering the Max FPS setting on some setup reduces the latency up to 10-20 ms.

Reduce the In-game Max FPS

Launch your Valorant game and go to the Settings > Video Tab.

Change the Max FPS Always to 50-60 or even 40 and see if that fixes your problem.

Another possible fix for this one is to disable Windows Firewall or Add Valorant to exception.

Disable Firewall / Add Valorant Executables to Exception

Open up Start Menu and search for Firewall & Network Protection and open it up.

valorant-error-code-68-allow-to-firewall-1

Click on the Allow an app through Firewall and click on the Change Settings button with the administrator shield icon.

valorant-error-code-68-allow-to-firewall-2
valorant-error-code-68-allow-to-firewall-3

Click on Allow another app button then browse for your Valorant shortcut file on desktop. Select the shortcut file and hit open button. It will add an app called RiotClientServices.

valorant-error-code-68-allow-to-firewall-4

Then add another app then navigate to your Valorant installation path. Open up the Valorant Folder.

valorant-error-code-68-allow-to-firewall-5

Open the live folder and add the Valorant.exe application to the firewall.

valorant-error-code-68-allow-to-firewall-6

This will add an app called BootstrapPackagedGame, and make sure that it is allowed for both private and public networks.

valorant-error-code-68-allow-to-firewall-7

Allow another app one last time, while on the same path navigate through Valorant Installation Path – “Valorant/live/shootergame/binaries/win64/” and then add the VALORANT-Win64-Shipping.exe to the exceptions.

valorant-error-code-68-allow-to-firewall-8
valorant-error-code-68-allow-to-firewall-9
valorant-error-code-68-allow-to-firewall-10

Be sure to have the rules for Valorant, BootstrapPackagedGame and RiotClientServices apps to be allowed both for private and public networks by ticking the respective checkboxes.

You can also try to update your account using riots troubleshooting page if in any case your account has been set to a different location.

Change Region of Riot Account

It is possible that if you had your account created already before (if you’ve played League of Legends on any server or basically just played the game before) chances that your account might be connecting on a different region.

Click on the change account region button and login your account and follow along the instructions.

If that automatic change region page fails, you might have to submit a support ticket here.

Related Articles


How to fix Valorant error code 68

In this article I’ll show you how you can fix Valorant error code 68 with the possible methods / solutions!

Fix Valorant Error Code 68

This guide will practically address the particular error, “Valorant has encountered a connection error, please re-launch the game” with the error code 68 shown along with this error window. A lot of players reported that they are experiencing Error Code 68 that pops out randomly during matches or while in-game. Error Code 68 is one of the many annoying error codes in Valorant.

There are possible various causes for this particular error and so carefully follow along the video tutorial or the text guide written below to get this problem fixed.

Video Tutorial

Step-By-Step Guide

Solution #1: Add Valorant to Firewall Exception

The first possible fix for Valorant error code 68 is to add valorant to firewall exception.

Open up Start Menu and search for Firewall & Network Protection and open it up.

valorant-error-code-68-allow-to-firewall-1

Click on the Allow an app through Firewall and click on the Change Settings button with the administrator shield icon.

valorant-error-code-68-allow-to-firewall-2
valorant-error-code-68-allow-to-firewall-3

Click on Allow another app button then browse for your Valorant shortcut file on desktop. Select the shortcut file and hit open button. It will add an app called RiotClientServices.

valorant-error-code-68-allow-to-firewall-4

Then add another app then navigate to your Valorant installation path. Open up the Valorant Folder.

valorant-error-code-68-allow-to-firewall-5

Open the live folder and add the Valorant.exe application to the firewall.

valorant-error-code-68-allow-to-firewall-6

This will add an app called BootstrapPackagedGame, and make sure that it is allowed for both private and public networks.

valorant-error-code-68-allow-to-firewall-7

Allow another app one last time, while on the same path navigate through Valorant Installation Path – “Valorant/live/shootergame/binaries/win64/” and then add the VALORANT-Win64-Shipping.exe to the exceptions.

valorant-error-code-68-allow-to-firewall-8
valorant-error-code-68-allow-to-firewall-9
valorant-error-code-68-allow-to-firewall-10

Be sure to have the rules for Valorant, BootstrapPackagedGame and RiotClientServices apps to be allowed both for private and public networks by ticking the respective checkboxes.

Solution #2: Change DNS on Windows

Another step that we can do to fix valorant error code 68 is to change dns on Windows.

valorant-error-code-68-change-dns-fix-1

Right click on your Windows network icon or wifi icon and click on Open Network & Internet Settings.

valorant-error-code-68-change-dns-fix-2

Click on Change adapter options then right click your network or wifi adapter click on properties.

valorant-error-code-68-change-dns-fix-3

Find Internet Protocol Version 4 (TCP/IPv4) then click on properties.

valorant-error-code-68-change-dns-fix-4

Click on the Use the following DNS addresses automatically. and enter the following respectively:

Preferred DNS Server: 1.1.1.1

Alternate DNS Server: 8.8.4.4

Save all the changes and restart your computer.

Solution #3: Use VPN Temporarily to play Valorant

Lastly, if all solution fails, try using a vpn and see if the valorant error code 68 gets fixed.

There had been reports that Valorant has some issues with routing with different ISPs as of the moment hence one way to temporarily address this concern rather than wait till it gets fixed by riot is to use VPN.

Signup for a free account (3-servers available for free) then download and install ProtonVPN.

valorant-error-code-68-fix-use-vpn

After installation, run the VPN and try playing the game if you still encounter error code 68.

Related Articles


How to fix Valorant error code 138 connection error

Learn how to fix Valorant error code 138 connection error easily with all the possible fix or solution. Valorant error code 138 can be fixed by these methods.

This error are reported to be occurring just recently with lower-end computers and so I have compiled the possible solutions SO FAR for this particular error code 138 connection error in Valorant.

Follow along on the video tutorial below or read through the step-by-step guide below.

Video Tutorial(s)

Step-by-Step Guide

Solution 1: Bcdedit Configurations

The first solution to fix error code 138 on Valorant is to apply some bcdedit configurations.

Open up a command prompt by going to your start menu and look for “Command Prompt” and make sure to run it as administrator.

valorant-connection-error-code-138-open-command-prompt

Type in the following codes:

bcdedit.exe /set {current} nx OptIn
bcdedit.exe /set testsigning off
bcdedit.exe /set nointegritychecks off

Note: If you experience “The value is protected by Secure Boot policy and cannot be modified or deleted” make sure to turn off first your secure boot option on your BIOS.

Next, restart your computer and check if Valorant is now working properly.

Otherwise, continue with the other possible fixes below.

Solution 2: Set Compatibility to Windows 8

Another solution to fix the error code 138 on Valorant is to Set the Compatibility to Windows 8.

Locate your Valorant shortcut icon on your desktop or start menu.

Right click on the shortcut and go to properties.

Check the “Run this program in compatibility mode for: Windows 8” and check the Run this program as an administrator. Hit the apply and ok button.

valorant-connection-error-code-138-set-compatibility-windows-8

Solution 3: Set VGC Process Priority to “Normal”

Another solution that you can try to fix error code 138 on Valorant is to set the VGC Process Priority to “Normal”.

Go ahead and open up task manager and look for the process “Vanguard tray notification” right click on it and click on go to details.

valorant-connection-error-code-138-open-task-manager

Right click on the process and make sure to set the priority to Normal.

Other possible soluton:

If all else fails and you still get error code on Valorant, kindly check if your processor is AMD A-Series processor such as AMD A6, A10, and so on. there had been reports that the Valorant’s Vanguard Anti-cheat system has a particular conflict / issue with these processors and also some other unnamed processors.

Riot is investigating the matter as of the moment and so if nothing fixed your problem and it still shows up error code 138, you’ll have to wait for a patch from Riot to address this issue.

Reddit thread Source

Related Articles


How to quickly enable fps and ping counter in Valorant

Learn how you can quickly enable fps and ping counter in Valorant!

In this article, If you’ve been an old-time FPS player before you will know how important it is to have the FPS and Network Latency / Ping shown right on your screen!

If you are just starting out, well it’s never too late to learn!

I have included in this article a video tutorial to demonstrate the steps or you can just read through the steps written right below it.

Video Tutorial

Steps to Enable Ping & Fps in Valorant

  1. Open up the game, and upon entering the lobby click on the gear icon on the top-right most portion of the screen.
  2. Click on settings. You’ll be taken to General tab by default go to Video Settings.
  3. While on the Video Settings, you will be shown with another 3 options.
  4. Open up the stats under the Video Settings.
  5. Enable “Client FPS” to show game fps and for the ping the options that you can enable are “Server Tick Rate”, “Network Round Trip Time” and “Packet Loss”.

Related Articles


How to surrender in Valorant

Wondered how you can surrender in Valorant? Here’s how!

Due to the growing popularity of Valorant, many players are just struggling to match the opponent’s skills and difficulty. The game itself is more complex that what it may look like on first impression. There are games where the opponents are just way to better than your team and surrendering is the only key to end the endless battle fights.

In response to this, Riot Games has added a surrender feature to Valorant, allowing players to bow down to their opposing team early even before the match is concluded–free of consequences.

How do you Surrender in Valorant?

To surrender in a Valorant match, a player can use either of the three commands into the game-chat. “/surrender”, “/concede”, and “/ff” are all the commands viable to end a game. This will begin a surrender vote, a system that is common in all pro-league games such as League of Legends, in which all teammates will get a notification that a surrender option has been started. Hence, other players on the team can vote yes or no to the surrender using the keys F5 and F6 respectively. Alternatively, players can also vote by typing the “/yes” or “/no” command into the chat. For a surrender vote to pass, each member of the team needs to vote in favor of surrendering the entire match. If a SINGLE player votes no, or no one votes at all then the match will continue.

What do you think about this surrender feature of Valorant?

Related Articles


Ultimate Valorant FPS-Boost Settings and Tweaks (5 Methods)

Learn how you can tweak Valorant to gain significant increase/boost in FPS up to 60-140 fps!

You may have a potato machine that’s already few decade old and in this article I’ll share the settings and configurations that you must adjust to improve your gaming experience!

Video Tutorial

FPS-Boost Tweak Outline

  1. Tweak Valorant’s In-Game Settings
  2. Graphics Profile (Set Valorant as High Performance)
  3. Reduce Windows Animations & Power Scheduling
  4. Optimize Power Plan
  5. Configure Game Render Quality

Tweak Valorant In-Game Settings

This one is the most obvious one, however I decided not to exclude this tip as this is definitely important basic tweak that affects significantly game performance.

So, tweak the Valorant’s in-game settings by going to the settings (click on the gear icon top right, or press esc, go to lobby and the button is placed on top right) then go to Video tab, then go to Graphics Quality.

graphics-quality-settings-valorant

The most important settings are the multithreaded rendering, (material, texture, detail, ui) quality, vsync, anti-aliasing, anisotropic filtering and first person shadows.

The rest you can change depending on your preference however I would recommend to copy the same configurations as shown above.

Graphics Profile (Set Valorant to High Performance)

Open up start menu, and search Display Settings then open it up. Scroll down until you see Graphics Settings then click on the browse button.

Locate Valorant installation folder, up until the “live” folder where Valorant.exe is located.

valorant-fps-boost-graphics-settings-tweak-1

Click on the options button, and under the “Set graphics preference” choose High performance.

Reduce Windows Animations & Power Scheduling

Go to start menu, search for control panel then go to System and Security. Click on System and on the top left portion, click on “Advanced system settings”. Click on the advanced tab and click on the settings button on the “Performance” group.

Select Adjust for best performance under the Visual Effects tab, and on the Advanced tab click on Adjust the best performance to Programs.

Optimize Power Plan

Open up start menu, search for Power Options. Alternatively, you can right click on the battery icon on taskbar if you have one and select Power Options.

Be sure you are on the High performance power plan. Click on the change plan settings of the High performance power plan then click change advanced power settings.

Find Processor Power Management and set the maximum processor state to 100%.

Next, this step is optional. If you have the “Amd Power Slider” option, expand that one and be sure to set the Overlay to Best Performance.

This option is only available to some AMD powered desktops or computers. This step is optional.

Hit apply and ok once done.

Reduce Game Render Quality

Open up a file explorer, then go to the address bar and type in %appdata%

Click on the roaming folder o the back icon to go one directory backwards and go to the Local folder.

Look for the Valorant folder and navigate through the Saved folder until you see the Config folder.

reduce-render-quality-valorant-1

Open up the config folder and look for ALL the folders under the (Valorant/Saved/Config directory) that has a file called GameUserSettings.ini

Open up the GameUserSettings.ini and scroll down until you see sg.ResolutionQuality setting.

Set this one depending on your preference (80-95% has very minimal reduce in video quality).

The more you reduce this percentage value the more the game would reduce the game render quality.

The lesser the game render quality = the more blurry the game looks.

reduce-render-quality-valorant-2

Once done, relaunch your game and tweak as to how much percentage should work optimally on your system.

Related Articles


Valorant has encounted a connection error – 6 Solutions / Fix (2020)

In this video-article tutorial, I’ll be showing you 6 solutions to fix Valorant has encountered a connection error on Windows.

There are a lot of possible things that could cause this connection error on Valorant such as firewall issues, ISP issues, network and server issue, corrupted files and so on.

The steps that I’ll be showing are the compiled and tested solutions that WORKED for most of the people including myself so I’ll share them with you along with a video tutorial on this article.

Video Tutorial

Valorant has encountered a connection error – 6 Solutions / Fix (2020) | FreeSoftwareTips

Outline Solutions/Fix

  1. Solution #1: Automatic Startup VGC Service
  2. Solution #2: File Signature Verification
  3. Solution #3: Disable test mode & enable driver signature enforcement
  4. Solution #4: Windows 7 Hotfix / Security Update
  5. Solution #5: Check Windows Updates
  6. Solution #6: Delete Riot Vanguard Service, Folder, Reinstall

Solution 1: Automatic Startup VGC Service

  1. Open up start menu > services.msc > right click and run as administrator.
  2. Look for “vgc” service name, then right click and click on properties.
  3. Set the startup type to “Automatic”, then hit the apply button and ok. Then click on the start button if the service isn’t running.
  4. Test Valorant if it works.

Solution 2: File Signature Verification

File Signature Verification tool can be used to check for unsigned drivers that might be causing issues in conflict to the anti-cheat system of Valorant.

  1. Open up command prompt with administrative privilleges.
  2. Type in “sigverif” and hit enter.
  3. Click on start button to verify all files and drivers on your computer.
  4. It will then show you which drivers/files are unsigned which will be needed to be uninstalled manually or removed otherwise it will notify you that every files and drivers are properly signed.

Solution 3: Disable test mode & enable driver signature enforcement

  1. Open up command prompt with administrative privilleges.
  2. Type in “bcdedit.exe /set testsigning off” and hit enter.
  3. Next, type in “bcdedit.exe /set nointegritychecks off” and hit enter.
  4. Restart your computer.

Solution 4: Windows 7 Hotfix / Security Update

  1. Just simply download and install this Windows 7 Hotfix / Security update and make sure that it is installed on your system.

Solution 5: Check Windows Updates

  1. Open up start menu, look for “Windows Updates”.
  2. Click on “Check for updates” or “Windows Update Settings”.
  3. Be sure to keep your Windows updated as to avoid any conflict with Valorant anti-cheat system vanguard.

Solution 6: Delete Riot Vanguard Service, Folder, Reinstall

  1. Open up command prompt as administrator.
  2. Type in “sc delete vgc” hit enter.
  3. Open up task manager, look for “Vanguard” process or “Vanguard tray notification” process and end task that one.
  4. Go to C:\Program Files or where your program and files are located on Windows.
  5. Look for “Riot Vanguard” folder and delete it.
  6. Re-launch Valorant and it will download and reinstall vanguard for you.
  7. Restart your computer once done to initialize vanguard anti-cheat system and repeat Step 1 to make sure that vanguard is always running.

Related Articles