1

Step-by-Step Guide: How to Fix Error Code 0x8007000D in Windows 11

Introduction

In a world where keeping your system up-to-date is not just a convenience, but a necessity for maintaining security and optimal performance, encountering an error during an update can be more than a little frustrating. One such error that has been plaguing Windows 11 users is Error Code 0x8007000D. This guide aims to be your friendly companion in resolving this pesky issue, ensuring your Windows 11 system gets back on the update track.

Understanding Error Code 0x8007000D

Error Code 0x8007000D is not as cryptic as it appears. This code is Microsoft’s way of telling you that there’s something amiss with your update files or process. It usually occurs when you try to install system updates through Windows Update.

Causes of Error Code 0x8007000D in Windows 11

Several factors can trigger this error, ranging from corrupted system files, outdated drivers, to conflicts with third-party software. Knowing the root cause can be a significant step towards resolving the error.

Preparing Your System for the Fix

Before diving into the troubleshooting steps, it’s wise to ensure that your system is ready for the fix. Create a restore point to safeguard your data and settings, and make sure you have the necessary administrative privileges to carry out the solutions.

Step-by-Step Guide: How to Fix Error Code 0x8007000D in Windows 11

Step 1: Restart Your Computer

  • Click on the Start button.
  • Select the power icon, then choose “Restart.”

Step 2: Run Windows Update Troubleshooter

  • Press Win + I to open Settings.
  • Navigate to “Update & Security” > “Troubleshoot” > “Additional troubleshooters.”
  • Click on “Windows Update” and then “Run the troubleshooter.”

Step 3: Reset Windows Update Components

  • Press Win + X and select “Windows Terminal (Admin)” to open it with administrative privileges.
  • Type the following commands, pressing Enter after each:
net stop wuauserv
net stop cryptSvc
net stop bits
net stop msiserver
ren C:\Windows\SoftwareDistribution SoftwareDistribution.old
ren C:\Windows\System32\catroot2 catroot2.old
net start wuauserv
net start cryptSvc
net start bits
net start msiserver

Step 4: Run the SFC and DISM Commands

  • Open Windows Terminal as an administrator again.
  • Type sfc /scannow and press Enter. Allow the process to complete.
  • Now type the following command and press Enter:
DISM /Online /Cleanup-Image /RestoreHealth

Step 5: Update Drivers and Software

  • Right-click on the Start button and select “Device Manager.”
  • Expand each section, right-click on each device, and choose “Update driver.”
  • Select “Search automatically for updated driver software” and follow the prompts.

Step 6: Perform a Clean Boot

  • Press Win + R, type msconfig in the box, and hit Enter.
  • In the System Configuration window, go to the “Services” tab.
  • Check “Hide all Microsoft services” and then click “Disable all.”
  • Go to the “Startup” tab and click “Open Task Manager.”
  • Disable all startup items, close Task Manager, and click “OK” on the System Configuration window.
  • Restart your computer.

Conclusion

With this guide at your disposal, addressing Error Code 0x8007000D on your Windows 11 system should now feel like a manageable task rather than a daunting challenge. Follow the steps outlined, maintain patience, and soon your system will be smoothly running updates, ensuring you continue to enjoy an optimized Windows 11 experience.


How to Disable Windows Defender in Windows 11 | Turn off Windows Defender (Permanent)

In this article, I’ll be showing you how you can disable Windows Defender on your Windows 11.

Before we get started, just a disclaimer: This might be a little different compared to what you are used to before when you are disabling a Windows Defender or Windows Security on Windows 10 as Windows 11 has tighter security measures before you can actually disable it.

Now, let’s get started!

First, go ahead to the Start menu and type in the search bar “System Configuration” and open that app. We are going to be booting a safe mode boot option, so go the Boot tab. You will see the Boot options so make sure to check the Safe boot and set it as minimal. Hit the apply button and ok button.

After that, you just have to click “Exit without restart” just to confirm that the Windows Security is currently running on the computer. You may go back to the start menu and look for the Windows Security app.

As you will see, the Virus & threat protection will show that it is turned on. Hence, you will need to restart your computer so we can disable that Windows Security feature on our Windows 11.

After restarting your computer, you will now be put in the Safe mode on your Windows 11. So you can now go ahead and change some settings on the registry.

Windows 11 on Safe Mode

Disable Windows Defender Using Registry

Go to the Start menu, right-click on it and select the run option. Type there “regedit“, hit the ok button, and you’ll be shown the Registry Editor window. You’ll now go to the HKEY_LOCAL_MACHINE folder and proceed to the SYSTEM folder. Then, look for the CurrentControlSet folder and under that is the Services folder, where we will be disabling particular services.

Under the Services folder, we are going to scroll down until we find the “Sense“. Click on it and we are going to be changing the Start key, which you’ll find on the right side. Open the Start key and change the value to “4” under the hexadecimal base and hit the ok button. These particular steps will be repeated as we go on.

Back to the left side column, we are going to be looking for the “WdBoot” folder. Same as before, we are going to click the Start key, and change the value to “4” with hexadecimal as base, then click ok.

Next, on the left side column, find the “WdFilter“. Repeat the process of changing the value on the Start key as we did before.

After that, you will look for “WdNisDrv” and repeat the same process.

You’ll be following the same steps with the “WdNisSvc” folder.

Lastly, repeat again the process for the “WinDefend” folder.

Finally, we now have successfully disabled the Windows Defender on the Windows 11.

In case you want to re-enable your Windows Defender, here are the default registry key values you will need to re-input:

  • Sense – 3
  • WdBoot -0
  • WdFilter – 0
  • WdNisDrv – 3
  • WdNisSvc – 3
  • WinDefend – 2

Disable Safe Mode – Boot in Normal mode

You can now close the Registry Editor and now go back on the Start menu. Right-click on it, select the run button, and type in “misconfig” and hit ok. Go to the Boot tab and uncheck the Safe Boot under the Boot options. Hit the apply button and ok button. Then, restart your computer.

Now, we are now back in the normal mode on Windows 11.

For us to check whether we have successfully disabled the Windows Security or Windows Defender on our Windows 11 OS, go back to the Start menu, search “Windows Security” and open that app.

You will notice that the Virus & threat protection, it will just be stuck on “Getting protection info…” and it will never load up the Windows Security service on your computer.

Disabled Windows Security in Windows 11

That’s basically it. Hopefully you were able to disable Windows Defender or Windows Security on Windows 11 through this article.

Comment down and let me know if everything worked for you.

Are you currently using Windows 10? We also have a guide in disabling Windows defender on Windows 10! Just click here.

If you had a hard time following the instructions, try watching this video tutorial right below:

Video Tutorial! (Turn off Windows Defender – Permanent)


How to install Google Play Store on Windows 11 (Easy) | Run Android apps on Windows 11

I’ll be sharing with you the easiest method and how can you actually install google play store directly on your windows 11 without having to install third-party apps or emulators.

So far this is the easiest method that I’ve actually tried myself hence let’s now go to our desktop so that I can show you how can we actually install google play store or android apps directly on your windows 11.

Step-by-step guide: Let’s install google play store on Windows 11

Windows Toolbox

First, let’s now go ahead and open up our web browser go ahead and proceed to this link and you’ll be shown with the github page of the powershell windows toolbox.

This is an open source application that we are going to be using to be able to install the google play store easily on your windows 11.

What you will have to do is to just simply go ahead and scroll down to the middle part of the page until you see this command under the “How to Use” section.

Next, go ahead and go to the start menu and look for powershell right click the windows powershell and make sure to run it as administrator.

Hit the yes button if you are prompted with the uac and once the powershell is loaded up, go ahead and paste the link that we’ve just copied a while ago and hit the enter button on your keyboard.

Then you will now be shown with this particular window right here:

What we’re interested in is to go first on the back up and restore and click on the create restore point we are going to create first a system restore point so that we can go back or undo all the changes that we’ve made in case something goes wrong during the process of installation.

Once the restore point has been created, it will take you back to the windows toolbox app you simply go ahead and look for the install google play store for windows 11 button.

You’ll be shown with this window right here if you’re shown with this prompt right here wherein the pc will automatically restart after enabling the windows subsystem for android just simply type in yes in the command line.

After a successful restart on your computer or your laptop, we can now go ahead and go back to our web browser and then go to the previous link that we’ve opened a while ago which is the github page for the powershell windows toolbox project.

We will have to reopen the windows toolbox by copying and pasting the command from the github page once again.

Once the windows toolbox is opened we’re going to scroll down on the bottom once again and click on the install google play store for windows 11.

It will ask us a different prompt this time around which is to download new version of windows subsystem for android with google play store service compatibility all we have to do is just enter p on our keyboard to proceed with this process go ahead and copy the link as shown on the screen and download the compressed file.

Once downloaded, you will be able to see the windows subsystem for android update 7z file which is compress zip file so we’re just going to right click on this one and click on the copy as path.

Next, go ahead and paste the path of the file on this command line right here once you’ve pasted the path for the windows subsystem for android 7 7z compressed file all you have to do is just hit the enter button on your keyboard all you have to do again is to just wait for this process to complete

Once it is done you will be shown with all of this apps right here such as this windows subsystem for android app that shows you a progress that it is currently starting up that particular app.

All we have to do is go to this optional diagnostic prompt that we might be shown just simply click on the continue button and we are just going to wait until this process is complete and it should automatically turn on the developer options and you will be shown with a notification indicating that the google play protect is currently turned on.

Hence, the google play store is now currently installed on our windows 11.

To open up the google play store simply go to the search button on your task bar and then search “play store” and you’ll be able to see the google play store app installed directly on your windows 11.

All you have to do is just right click on the app and click on the pin to start or pin the taskbar for easier access.

Did everything went well while following this guide? If yes, then you’ve successfully installed Google Playstore directly on your Windows 11.

Having a hard time to follow through the instructions? Here’s a video guide for you!

Video Tutorial (Run android apps on Windows 11, no emulators!)


Paraphrasing Dos & Don’ts: How a Paraphrasing Tool help effectively?

If we talk about the term, ” paraphrasing” then it can be the process of duplicating others’ content and reusing it by turning it to the original version. Though, there are crucial paraphrasing dos and don’ts that every content writer must know. Most people are unaware of the basics. And that is why when they use paraphrasing tools – people take their content as cheating.

Generally, paraphrasing or rephrasing is the process of placing knowledge into your terms without altering the primary meaning. Staring at the unusual words added by the original writer and reviewing your paraphrase by matching it with the original text assures you have made it accurately.

Before rephrasing, it is essential to read and understand the central idea or aspects of a topic and combine critical thinking. So, if you are also struggling to rephrase content but worried about being called a cheater, we suggest you read this guide to the bottom line. 

The Dos and Don’ts of Paraphrasing!

Below we have gathered the crucial dos and don’ts points that show you how to paraphrase correctly and avoid appropriation and risks of cheating. To efficiently rephrase, you can take a look at the following easy steps. So, let’s get into it!

The Dos:

There are four R’s of paraphrasing covers Reword, Rearrange, Realize and Recheck! Whether you are using a word changer (paraphrasing tool) or doing it manually, these four R’s can help you get the job done correctly:

  1. The first thing you have to do – read the content you desire to rephrase. After that, try to understand the context and concept fully. Understand what the content is about and whatever it talks about.
  2. The second step is to note the critical details. These are the points that if you drop from your craft, then the concept will get lost entirely.
  3. When you reach the third step, you have to begin the rewriting process. By following the first and second steps, you can also utilize paraphrasing tools to switch your version correctly.
  4. Last step! It is time to analyze and compare your content with the original work. You can also use a plagiarism checker tool to know how original your content is; it would help you recognize words that are still similar.

The Don’ts:

Like writing professionally, rephrasing is also an art that you have to learn. It is essential to note everything that you should not do when beginning the spinning process. Paraphrasing is not about using an article spinner or paraphrasing tool and ‘rewrites article’ within instants. It is something about giving a few minutes to place in your ideas. Yet, the below-listed don’ts can help you out:

  1. Do not overlook the original author.

Firstly, do not miss acknowledging through in-text citations – the source of ideas and information you have used in your content. It is essential to write that general knowledge does not require to be cited. But, if you have grabbed any idea from any other author, then you have to cite the source to give their credits.

  • Add Quotation marks for Quotes.

Do not forget to add quotation marks in words and phrases – used by a different author. And for this, you have to quote a text by using quotation marks. Users will quickly recognize such texts as copied texts.

  • Paraphrase sentences, not phrases/words

Do not only change play around with some words of a writer’s primary work for application in your content. You have to try combining some words and sentence structures, applying synonyms. It will reduce the high chance of plagiarism and make your content 100% unique.

Paraphrasing Tools Can Help you Efficiently! – Updated for 2021

Today, many word spinner tools promise to help you in the context of producing 100% plagiarism-free content. Yet, not every paraphrasing tool is the trustworthy one.

After knowing this fact, we have tried several tools available and came across the most efficient ones. We would like you to take a look at the below-listed hot picks selected best for you!

●       SearchEngineReports.net

Here comes one of the most luxurious and comfortable online paraphrasing tool, allowing you to rephrase your content with zero errors. The free article rewriter by SearchEngineReports.net has advanced features that detect and analyze the entered text from the available data on the internet. After knowing the text context, this article spinner’s system will spin the original version with a 100% unique version of the content in seconds.

  • Spin Bot

Another famous and reputable tool selected best for rephrasing is SpinBot. This platform has a secure, clean, fast, and smooth user interface, allowing users to paraphrase their content with ease. SpinBot also offers a free version to its users along with handy features. Utilizing any rephrasing tool is an easy job. All you have to do is pick and drop your text in the input box, and the system will handle the rest!

So, readers, this is what you need to follow before paraphrasing anything!


How to Setup your Google Cloud for FREE

Setting up a google cloud account is easy. It has a lot of features which is in high demand in the IT industry today. Google is also handing out $300 in credit if you sign up for a free trial. Starting with logging in your google account we’ll now head on to setting up your google cloud.


Google Cloud Setup

After logging in your google account, head on over to cloud.google.com/freetrial. With your google account you’ll see this on your screen:

This image has an empty alt attribute; its file name is image-64-1024x548.png

After choosing your country and checking the checkbox, click continue and you’ll be directed to the next step:

This image has an empty alt attribute; its file name is image-67.png
This image has an empty alt attribute; its file name is image-68.png

Fill out all the required fields along with the card details then click “Start My Free Trial”. Don’t worry about the requirement of a payment, that is to only ensure that the person is legitimate. Everything from this guide is free.

Congratulations! You now have a Google Cloud account with $300 worth of credit which can be used to run your servers or any features of Google Cloud.


How to change Wifi Password PLDT Home Fibr 2020

Learn how you can change wifi password on pldt home fibr router 2020. It might be intimidating when trying to change wifi password on pldt home fibr but follow along in this beginners friendly guide. Making sure that no unauthorized users are connected to your PLDT WiFi is crucial as they could be hogging up your bandwidth and speed thus makes your internet experience sluggish.

In this guide, I’ll walk you through step-by-step on how you can change the wifi password on your pldt home fibr router.

The steps on this video will be demonstrated using the router AN5506-04-FA PLDT ONU Router but the steps are generally applicable to almost any type/model of router.

Follow along the steps written below or through the video tutorial embedded on this page.

Video Tutorial

How to change Wifi Password on PLDT Home Fibr Router


To change the wifi password on PLDT Home Fibr router we need first to access the login page of the router.

By default the address is 192.168.1.1 so go ahead and open up a web browser (preferably modern browsers such as Google Chrome / Firefox / Opera / etc.) and enter this on the address bar: https://192.168.1.1 or 192.168.1.1 (with or without the https:// see which works out for you.)

Access the login page of your PLDT Home Fibr Router

If you are shown with this kind of error “Your connection is not private” simply click the advanced button and click on Proceed to 192.168.1.1 (unsafe)

Login page connection is not private pldt error
Note: I have changed my router ip address from 192.168.1.1 to 192.168.1.3

Afterwards, you will be taken to this login page. (The user interface / design may vary depending on your PLDT Home Fibr router)

PLDT Login Page

By default, the username is admin and the password is 1234 or 12345. This password may change if you’ve changed this already before.

Upon logging in it might ask you to change your password since the password 1234 is not secure and can be easily guessed by anyone connected on your router.

PLDT Change Initial Password Prompt

You MAY or MAY NOT see this kind of screen but if you do simply enter the old password “1234” and enter your new own password.

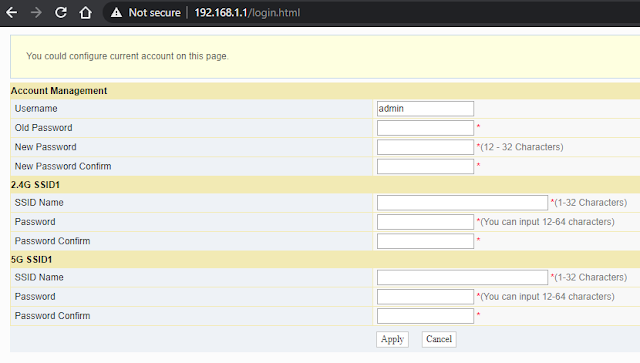
If you see this configuration prompt


New Passwords MUST include characters, numbers, and symbols. (Eg. !*TestPassword01) will work but (Eg. TestPassword) will not be accepted as it doesn’t have symbol/s and/or numbers in it.

The same goes with the 2.4G SSID1 and 5GSSID1 Passwords they must also meet the same requirement.

For the SSID Name, it represents the “Wifi Name” on your router so what you input to the SSID Name will be basically your Wifi Name.

Once configuring everything hit the apply button and you’ll be able to login.

If you didn’t see that configuration prompt


You can simply go ahead and continue along in this tutorial.

You will now be taken to this page and dashboard.

PLDT Device Information Page

Click on the Network -> Advanced and you will be shown with options to select which wifi ssid number you would like to change/configure.

Network Tab

To change the password, be sure to have the Security Mode under the Security Policy set to WPA/WPA2/WPAPSKWPA2PSK any of the security modes.

Then change the WPA Algorithms to TKIPAES and enter the wifi password you want to use under the Passphrase.

Change Wifi Password Router

Once done changing the wifi password, go ahead and don’t forget to apply the changes by hitting the Apply button.

Depending on your router, but on this particular router you can have up to 4 (Four) 2.4 Ghz Wifi SSIDs you can navigate through changing the SSID Choice.

Select Router SSID

And to change the PLDT HOME FIBR wifi password for the 5Ghz frequency, just simply go to the 5G Advanced tab and you will be shown with the similar configuration page.

Once done you can now reconnect to your wifi ssid and see if the passwords have been changed successfully.

Leave your comments, feedbacks down below or through YouTube comment section! I would love to hear your feedback and share your problems through the community and friendly tech-savy people might give you a hand.

Other Related Articles


How to limit wifi / lan users on PLDT Fibr Router (NO QOS)

Learn how you can limit wifi / lan users on PLDT Fibr Router without the need of QOS.

In this article, I included a video tutorial to demonstrate the needed steps to do this kind of feature on your laptop / desktop without the need of router QOS.

Video Tutorial

Download Arcai-Net Cut

Steps & Guide

Step (1/5): Enable telnet switch using fiberhomesuperadmin account.

PLDT Fibr Superadmin Credentials (2020): Click here

Step (2/5): Enable telnet Client on Windows

Step (3/5): Disable AP Isolation Telnet Credentials: Username: gepon or gpon Password gepon or gpon Command to be used: control port_fw_eligiblity_switch disable

Note: If you experience unkown command on Telnet you can SKIP this part and continue to STEP 4 & 5.

Step (4/5): Install Arcai Netcut on Windows or Android (Download Link Above)

Step (5/5): Configure / limit speeds of users! http://www.arcai.com/netCut/s/


Windows 10 Update Service is missing solution | 2020

In this tutorial, I’ll be showing you how to fix the Windows 10 Update Service is missing issue on Windows Updates.

This issue prevents windows update to check and install security and feature updates on your computer due to some corrupted registry keys and values and may also be due to disabled essential windows update services.

Video Tutorial

Download WUAUServFix10 Registry


Fix Windows 10/8/7 Slow Right-Click or Right-Click takes forever to load (2020)

Tired of endlessly waiting for your right click to load? Here comes the savior!

Windows Slow Right Click Problem

Windows Right-Click tend to slow down when the shell context menu on windows gets bombarded with apps.

In order to remove the context menu items or entries on Windows 10, 8, or 7 you can open up a registry editor and delete their respective entries manually.

The downside of doing these manually is that when you delete accidentally a folder or a registry entry there’s no going back or it is very difficult to undo those actions.

However I will be showing you a better method by using a simple app called “ShellExView” to do that process much easier and much faster.

Follow along on the video tutorial below or the step-by-step guide to fix your Windows right click menu in no time!

Video Tutorial

Download ShellExView

Fix Slow Right-click on Windows (Steps)

  1. Download the appropriate version of ShellExView posted above (32 bit or 64 bit).
  2. Next, Extract ShellExView on any folder or location. Eg. Desktop
  3. Open up shexview application upon extraction.
  4. Go to options > check the option “Hide all Microsoft Extensions”.
  5. Select all extensions (shortcut Ctrl + A) then disable them by clicking on the red button on the top left of the application.
  6. Go to options > Restart Windows Explorer.
  7. Hit the yes button and check if the problem is now fixed!


Paano Pabilisin ang Internet o Wifi sa Smart Phone / Android (PLDT/Globe/Converge) | 2020

Today papakita ko kung papano nyo mapapabilis ang overall browsing and internet speed o wifi ng internet nyo gamit ng Mobile Phone o Smart Phone device.

I’ll show you a simply trick that will dramatically increase the speed and performance ng kahit anong internet service provider such as PLDT, Globe, and Converge.

Video Tutorial

Step-by-Step

  1. I-Open ang wifi at mag connect sa wifi network nyo sa bahay. (Preferrably 5 Ghz kung malapit ka sa router o malakas ang signal otherwise connect to 2.4 Ghz wifi instead)
  2. Pumunta sa Settings > Wifi o sa ibang android / smartphone device simply long press the wifi icon.
  3. Long press the wifi network na gamit nyo o kung saan kayo naka connect.
  4. Select “Modify Network”.
  5. Sa IP Settings, palitan ng static instead of dynamic.
  6. Bumaba sa setting o i scroll hangang makita ang DNS 1 at DNS 2.
  7. Palitan ang dns 1 ng 1.1.1.1 at and dns 2 ng 1.0.0.4
  8. Ang mga dns na ito ay “Cloudflare DNS” na so far pinaka mabilis na query speed sa lahat ng authoritative dns servers. (Benchmark by DNSPerf)
  9. Click the save button pakatapos ilagay ito at obserbahan kung nag improve ang pag load ng webpages, browsing at overall internet speed sa inyong mobile phone/device.

Other Related Articles