Windows 10 BSOD: IRQL NOT LESS OR EQUAL NDIS.sys Fix
|
Learn how you can fix IRQL NOT LESS OR EQUAL NDIS.sys Blue Screen (BSOD) error on Windows 10 with 5 different tested working solutions.
Windows 10 BSOD or Blue Screen of Death can be caused by different issues on the system and so I will be showing you 5 different ways/methods on how you can fix and troubleshoot Windows 10 BSOD error “IRQL_NOT_LESS_OR_EQUAL” error.
The methods are demonstrated using the tutorial video below.
How to remove background using one-click method in Adobe Photoshop CC 2020
|
Learn how you can remove background from your photos using one-click method on Adobe Photoshop CC 2020!
I will teach you two methods on how you can remove backgrounds easily on Adobe Photoshop CC 2020 using the one-click method and the fastest masking technique workflow to remove backgrounds on images easily!
Follow along in this video tutorial, that can be located below or follow along the step-by-step guide on this article.
This feature is a new feature made available only on Adobe Photoshop CC 2020 version.
Go ahead and open up the image layer that you want to remove the background image on.
Make sure that the layer is unlocked, then go to the Windows options and be sure to open properties panel.
While clicking on the unlocked layer, scroll down on the properties panel until you see the “Quick Actions” part where you can find a remove background button.
If the button is disabled, then try converting your layer into a rasterized layer or a smart object.
Simply click the remove background button.
Wait until it finishes processing detecting the subject and it will now separate the subject from the background.
Masking Method
Go ahead and open up the image layer that you want to remove the background image on.
Click on the quick selection tool on the left toolbar of Adobe Photoshop CC 2020.
Click on the select and mask button on the upper center of Photoshop while selecting a layer and using the quick selection tool.
Use the quick selection tool brush to brush around the areas which you want to include into the mask.
Tip: You can change the color on the upper right side of the select and mask Window. Also, you can change the View Mode to “Overlay” and adjust the opacity depending on your preference.
Once you’ve made your selection, go ahead and use the refine edge tool just below the quick selection brush.
Adjust the brush accordingly (don’t use too small brush it’ll take a lot of time to process or too big brush since it will mess up details)
Tip: Use ALT + Scroll to zoom in/out on the image and use the SPACEBAR to move around the image to get close around the edges.
Once you have a clean mask, adjust the feather to 2-4 and feather to 1-3 (not too high) and on the output settings, tick the “decontaminate” option to further clean your mask.
Once done hit the ok button and it will now create your mask.
Voila! You have separated the subject from the background.
Add / Install Microsoft Store on Windows 10 LTSC or LTSB Editions
|
In this video-article tutorial, I’ll be showing you how you can install or add Microsoft Store on windows 10 LTSC or LTSB Editions.
On a fresh installation of Windows 10 LTSC or LTSB Editions of Windows, Microsoft Store is not made available unlike other Windows 10 editions such as Home and Pro.
Follow along on the video tutorial posted below, and the download the required resources using the download button located below.
Right click not working on Windows 10 start button / start menu
|
In this video-article, I’ll be showing you the step-by-step guide to fix right click functionality not working on Windows 10 start button / start menu.
Open up a file explorer and type on the address bar %appdata%.
Click the back icon or go one directory backwards that will take you outside the appdata roaming folder.
Open up “local” folder then look for Microsoft folder.
Scroll down until you see the “Windows” folder and open it up.
Download WinX files by clicking on the download button above.
Extract WinX files / folder to corresponding WinX folder placed under the opened Windows folder.
Replace all files (Group 1, Group2, Group 3) to fix any corrupted shortcut files and configurations.
Open up task manager, then restart Windows Explorer or simply restart your computer.
How to Properly Force Windows 10 v2004 2020 Update
|
Windows 10 has been blocking updates on many devices such as laptops, tablets, even desktop computers due to known bugs and issues with the latest v2004 Update.
However, PC enthusiasts and professionals who know that their systems are not affected by these particular issues and/or just wanted to try the latest Windows 10 2004 Update, in this article-video tutorial I’ll be teaching you a very simple method to properly force install Windows 10 2004 Update.
Open up Windows Security, Navigate to Device Security > Core Isolation > Memory Integrity. Set the Memory Integrity option to OFF.
Go here and download Microsoft Update Assistant Tool to update from Windows 10 version 1903 or 1909. NOTE: Windows 10 must be at least 1903 or 1909 for the tool to be able to detect and upgrade to 2004 version.
Download and open up the tool and proceed with the installation. (It will check system hardware requirements, etc) then proceed with the download and installation.
Restart your computer once done and proceed with update installations.
Viola! You have Windows 10 2004 update installed on your machine properly!
Fix Element 3D v2.2 Errors | for Adobe After Effects CC 2017/2018
|
Hi! In this tutorial we’ll be fixing Element 3D on After Effects. I’ll be showing you the common reasons why you experience invalid filter error, element.aex could not be loaded or even AE crashes when applying and using element 3d.
Follow along in this tutorial to get it fixed right away and use Element 3D without any problems at all!
This fix works for Element 3D used in Adobe After Effects CS6. CC 2014/2015/2015.3/2017/2018
In the video tutorial, one of the solution will require the specific OpenCL archive to fix Element 3D v2.2. You can download it by clicking on the button below:
In this video-article, I’ll be showing you how you can boost your PLDT Fibr’s 2.4 Ghz Wifi Network. Settings shown on this video tutorial may vary depending on your router however terminologies are usually similar to one another.
Steps & Instructions
Download & Install Wifi Channel Scanner or you may install on your mobile phone Wifi Analyzer.
Login to your PLDT Home Fibr Router using the FULL ADMIN ACCESS.
To learn more on how to access the FULL ADMIN ACCCESS of PLDT Fibr Router check out this video tutorial or article.
Follow along the video tutorial, on how you can use the app to choose the best wifi channel for your 2.4 Ghz wifi network and change the necessary settings as shown on the video.
How to reset DLL file association on Windows 10 (2020)
|
Sometimes file common file associations tend to get broken on Windows and one of which is the .dll files. It is not easy to undo such file associations as of the moment and so I’ll be demonstrating how you can fix the issue.
How to fix this issue?
Download the registry fix file: reset_dll_association.zip.
Extract the registry fix file on a folder.
Right click the registry key and click on Merge.
Open up task manager by going to start menu > search for Task manager > right click and run as administrator.
PLDT: Limit Wifi Speed using Telnet on PLDT Fibr Router
|
This will be a step-by-step guide on how you could limit wifi speeds using the telnet method on your PLDT Fibr router.
NOTE: On the video, a lot got confused about the set part, I wasn’t hitting the enter key but rather I was pressing tab to fill up the next possible command automatically.
I made this tutorial step-by-step to clear out any confusion.
Requirements
Before we start you’ll be needing to know a few things.
You must know what kind of router are you using, this method is only tested on router model AN5506-04-FA.
Next, get the latest admin credentials on this article / guide and included on that guide is a video tutorial on how you could login to a full admin account on a PLDT Fibr router.
First go to your browser 192.168.1.1/fh then log in to the fiberhomesuperadmin account.
(Don’t know how or what’s the username and password? Click here)
Enable the telnet switch and web admin switch under the debug switch and hit the apply button. After that, logout.
Login now to adminpldt account check again the credentials here;
The username and passwords vary depending on your router model and version.
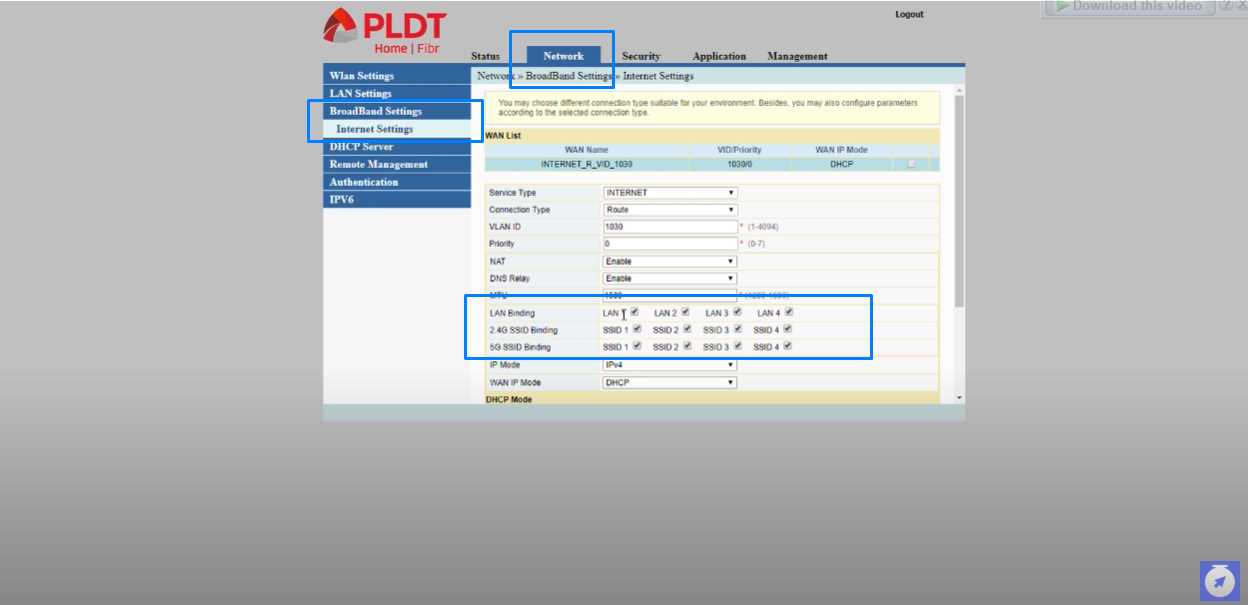
Upon logging in, click on the broadband settings under the network tab.
Enable all 2.4Ghz and 5Ghz binding namely SSID 1, SSID 2, SSID 3, and SSID 4 by ticking the checkbox then scroll down and hit the apply button.
By enabling these bindings you’re making sure that later when you create different wifi networks those wifi networks will have internet connection.
By default if you create other wifi networks they will have no internet that’s the fix for that one.
Next enable the telnet on your windows by going to start menu and search for apps & features.
Scroll down to the bottom and click on the Programs and Features under related Settings.
On the left pane, click the turn windows features on or off. Enable telnet client by checking the box and click on the apply button.
After than open a command prompt as administrator
(Windows 10) right clicking on your start menu > Command Prompt as administrator
(Other versions) search for command prompt > right click on it > Run as Administrator.
Type in telnet 192.168.1.1 (or your router ip address). (mine is 192.168.1.3)
For the login, type in gepon or gpon (whichever works for you) and password gepon or gpon.
Upon logging in, type in enable then the password that worked for you gepon or gpon.
Next, type in “cd pon”, if you don’t have this one or you’re redirected to gpon then this tutorial won’t work for you. Your router have no limiting functionality for wifi ssid’s.
After that, type in:
set ssid_rate_limit ssid <0-7> dir all max_rate <BW in kbps>
Terms:
<0-7> = 0-3 are the first four 2.4 Ghz SSID or WIFI ID’s and 4-7 are the four 5Ghz SSID or WIFI ID’s.
<BW in kbps> = Bandwidth speed in Kb/s for example 5 Mbps speed is 5000 kbps.
So to limit the first 2.4Ghz wifi with only 5 Mbps the command is:
set ssid_rate_limit ssid 0 dir all max_rate 5000
To remove the limit just set the max_rate to 0 and it will remove any wifi speed limit.
Example: To remove the 5 Mbps limit on the first 2.4Ghz wifi the command is “set ssid_rate_limit ssid 0 dir all max_rate 0”
After that, that’s it! Try connecting to that particular wifi and you’ll notice that it’s already limited to what you’ve set.
Enjoy and goodluck!
How to enable LAN PORTS on PLDT ONU Fibr Router
|
A step-by-step guide and procedure on how you could enable all LAN PORTS on your PLDT Fibr Router.
Before you could enable your router’s lan ports, you’ll need to know how you could access your PLDT Router’s FULL admin account. Yes, that’s right FULL ADMIN account is different from your default admin account provided by PLDT.
Why is that so? One main reason in separating and restricting users from accessing all the features of the router is to lessen technical support and problems encountered due to misconfigurations of settings.
It makes sense that basic home users have very-little to no technical knowledge / background when it comes to configuring techy-features that may be available on your router.
To access your full admin account, follow this tutorial before doing the steps below.
NOTE: This is only tested on AN5506-04-FA Procedure but it should work on most ONU Fibr modems.